
An interesting use-case for Intune and SCCM Co-Management - Part 1
Real-World scenario on where Intune and SCCM Co-management could come in handy. Setting up the Cloud Management Gateway.
Intro
If you have been following twitter or reading some blogs on SCCM Current Branch, chances are that you came across the term “Co-Management”. In short, Co-Management is the ability for a Windows 10 (Fall creators update - 1709) machine to be managed by Intune and Configmgr together.
These possibilities lead us to an interesting scenario. What if we would leverage the Intune capabilities to enable SCCM management ? Or in other words, let a user register its windows 10 device with Intune and then, via Intune install the SCCM Agent so that the device is Co-managed. Then we can use the best features from Intune and SCCM to fully manage a Windows 10 machine. Once we are in Co-managed state, why not enable conditional access and let Intune do that management.
Requirements
To enable the scenario above, we need to fulfill a few technical requirements :
- Windows 10 1709 build (Fall Creators Update)
- Configmgr 1710 Current Branch
- Cloud Management Gateway on SCCM
- Co-management enabled on SCCM
- Intune Stand-Alone
I’ll go over the complete setup, end-to-end, to get this scenario working, but with all the moving parts in play I need to split it up in several posts.
Cloud Management Gateway
The most complex part of the entire setup is getting the Configmgr Cloud Management Gateway up and running.
Requirements for cloud management gateway
- A site system server running the cloud management gateway connector point.
- Custom SSL certificates from the internal CA or AAD token Authentication (used to encrypt communication from the client computers and authenticate the identity of the cloud management gateway service.)
- Azure subscription for cloud services.
- Azure management certificate (used to authenticate Configuration Manager with Azure.)
Specifications for cloud management gateway
Each instance of cloud management gateway supports 4,000 clients.
Cloud management gateway only supports the management point and software update point roles.
The following features in Configuration Manager are currently unsupported for cloud management gateway:
- Client deployment
- Automatic site assignment
- Application catalog (including software approval requests)
- Full operating system deployment (OSD)
- Task Sequences (all)
- Configuration Manager console
- Remote tools
- Reporting website
- Wake on LAN
- Mac, Linux, and UNIX clients
- Azure Resource Manager
- Peer cache
- On-premises Mobile Device Management
Setting up the Cloud Management Gateway
Getting the necessary Certificates
As you have seen in the requirements, we need 2 certificates, 1 to authenticate Configuration Manager with Azure and one to identify our CMG on the internet (the public one). The public one, you can buy one from any of the online certificate authorities or you can generate one from your own PKI if you have it available. The management one can ofcourse also be bought but a self-signed is equally supported.
Although it is technically possible, it is very much not advised to use the same certificate for both needs !
In my Lab, I have a two-tier PKI setup and I’ll leverage that to generate the certificates I need. We need a certificate with an exportable private key that supports server authentication, so let’s create that template first. Log on to your issuing Certificate authority and open the “Certificate Authority” snap-in from MMC.
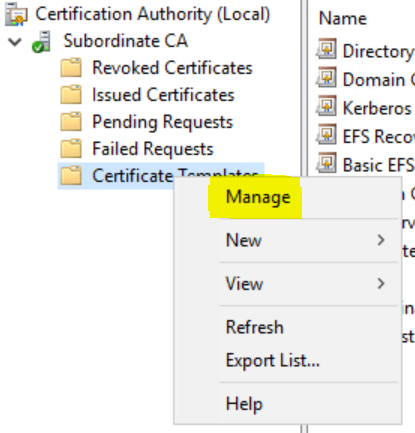
Find the “Certificate Templates” entry and right-click to select “Manage”
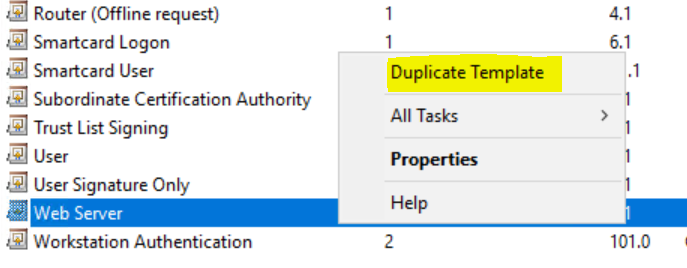
Find the Web Server template and duplicate it.
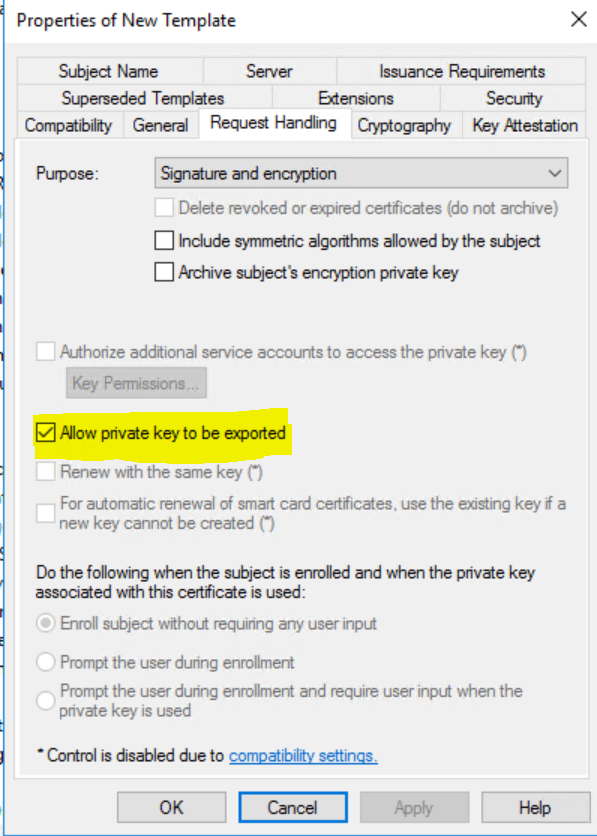
Give it a proper name on the General Tab so you can easily recognize it (eg, Cloud Mgmt Gateway), Make sure that your domain computers can enroll on the Security tab and mark the private key to be exportable on the Request handling tab
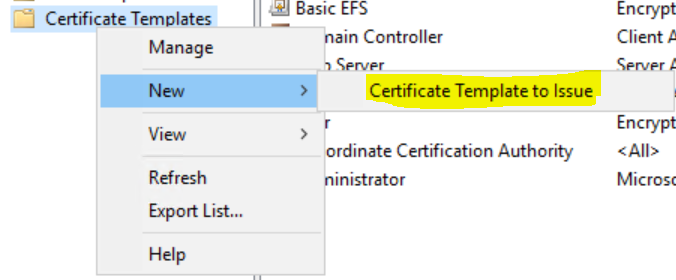
Once that is done, close the templates console and in the Certification Authority console again, right-Click Certificate templates again and select New / Certificate template to issue and select your newly created Cloud Mgmt Gateway template.
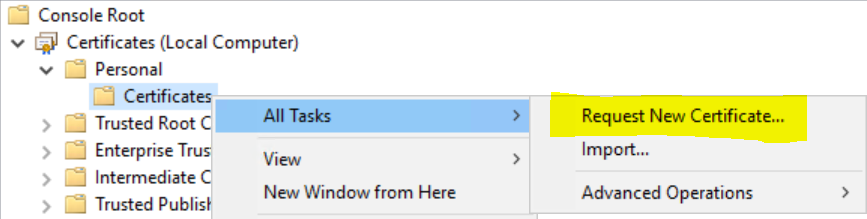
Now that we have the template waiting for us, we need to generate the certificates we need. From any machine in your domain, start the MMC Certificates console for the local computer.
Open the Personal / Certificates node, Right-click and select All tasks / Request new Certificate.
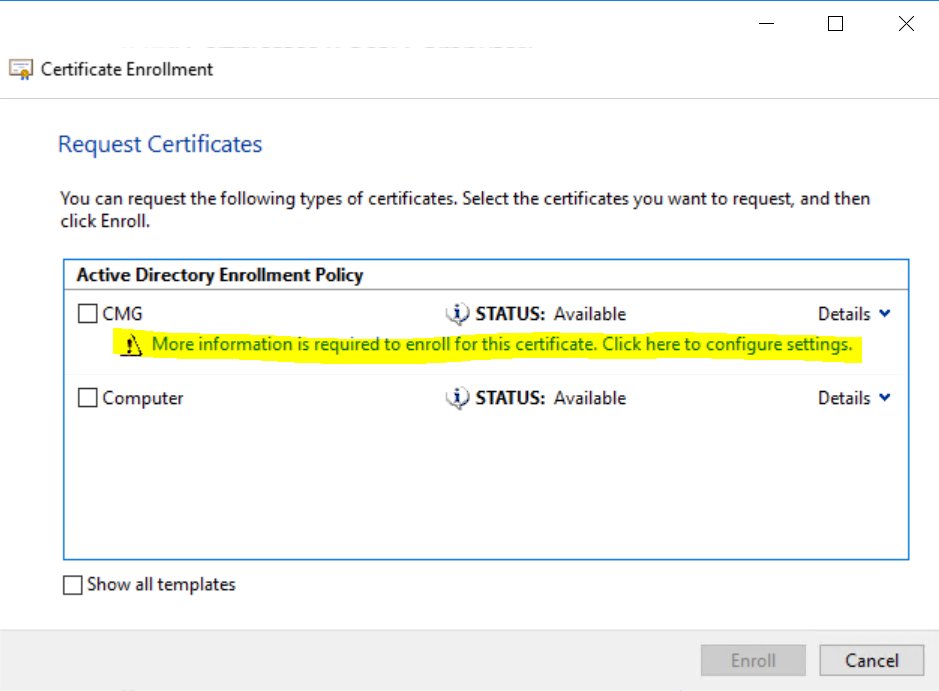
Select the template that you previously created and click the link that warns you that more information is needed.
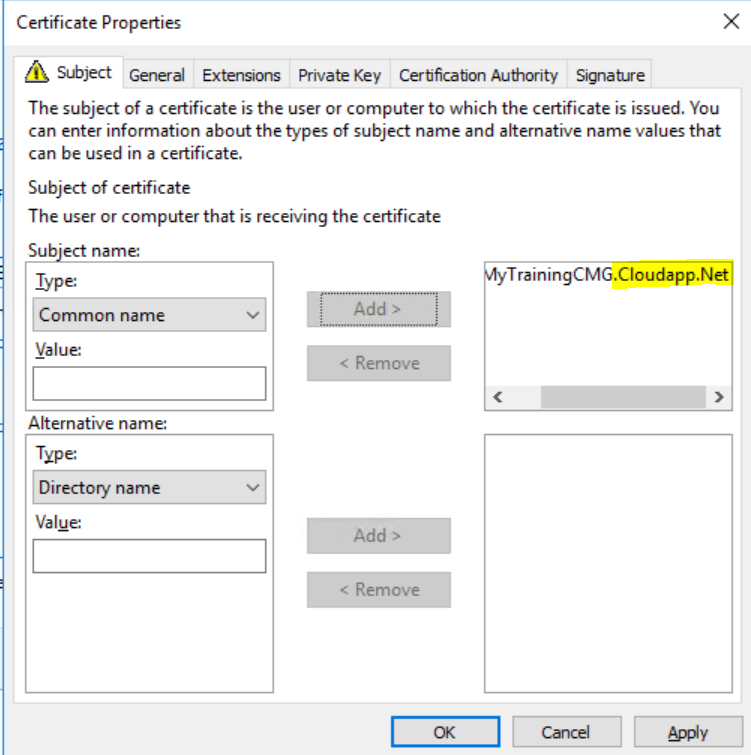
On the Subject Tab, Set the Subject name type to “Common name” and choose a name for your CMG. Make sure it ends in cloudapp.net. This will be our public certificate so it has to be unique on the internet (the process will fail down the line if your common name already exists). Click OK and Enroll.
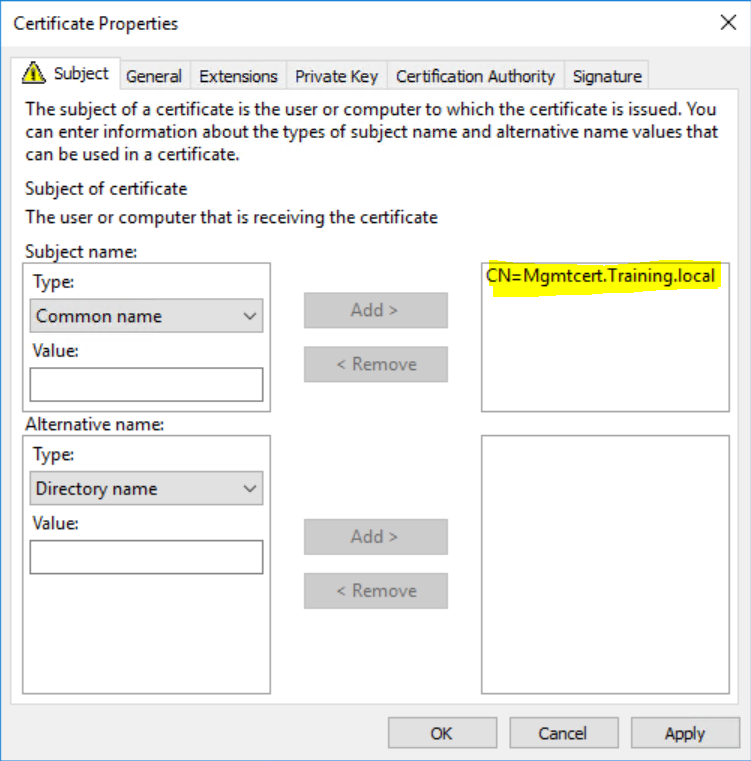
Repeat this process for the management certificate but your common name doesn’t have to end in “Cloudapp.net”. So in my case I will choose “MgmtCert.Training.Local” (training.Local is my domain name).
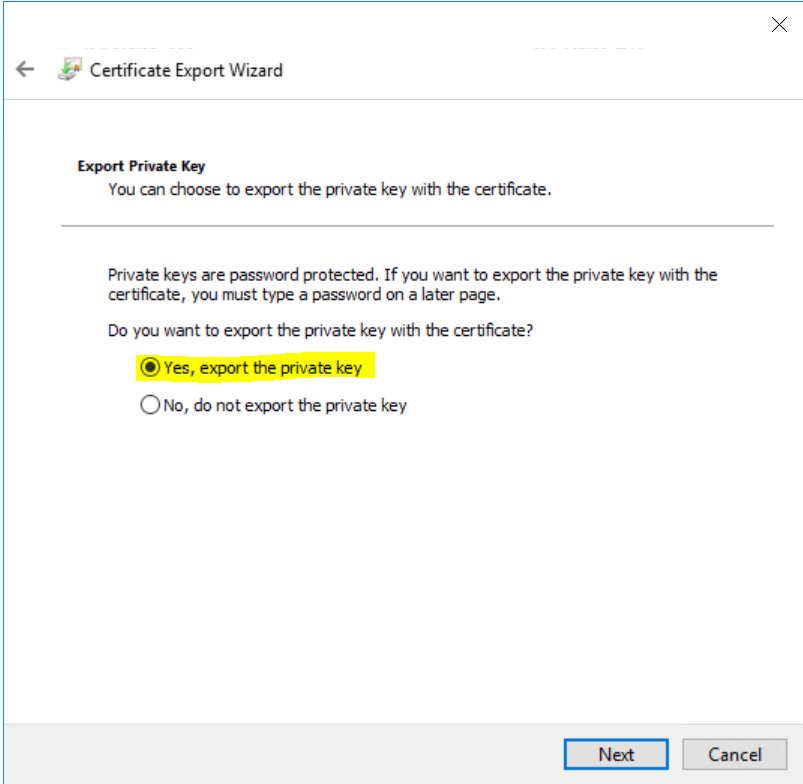
Once Enrolled, Select the Certificate you just created, right-click it and select Export it as a PFX file. Follow the wizard but make sure you select “Yes, export the private key”. Again, follow the wizard and specify a password to protect your certificate. Do this for both certificates.
Because we have issued the certificates from our own PKI infrastructure, we need to have an export of the Root and subordinate CA’s certificates as well. There are a few ways to get this accomplished, but the easiest is selecting one of our CMG certificates again from the certificates MMC snap-in.
Double-click it to open it and navigate to the Certifications Path-Tab.
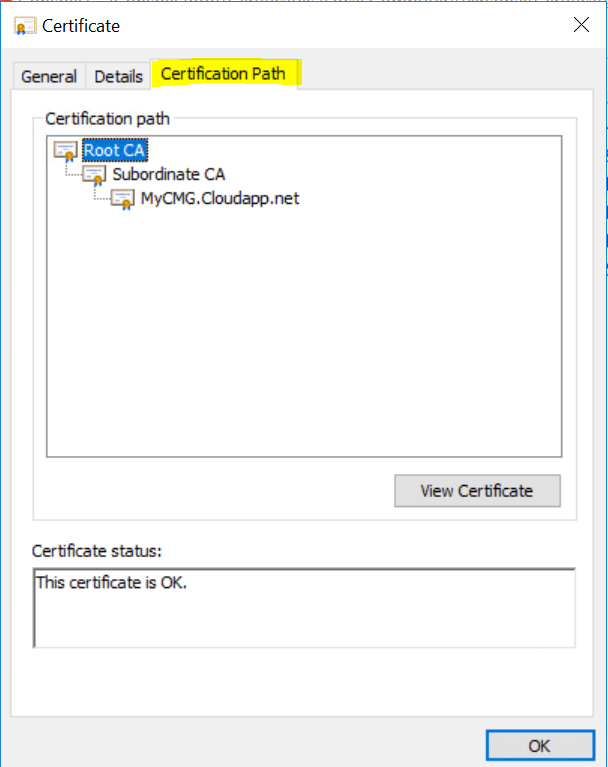
Select , one by one, each certificate of the chain by high-lighting it in the path and clicking the “View Certificate” button. This will open the specific certificate. On the Details tab of each certificate select “Copy to file”. Complete the new Export wizard using a DER .Cer file. Make sure to repeat the process for the subordinate CA if you have one !
Last, but not least, also export your public Cloud management gateway certificate and your management certificate as a .CER file as well.
Note this means you will have an export with and without the private key of these 2 certificates !
Uploading our certificates to Azure
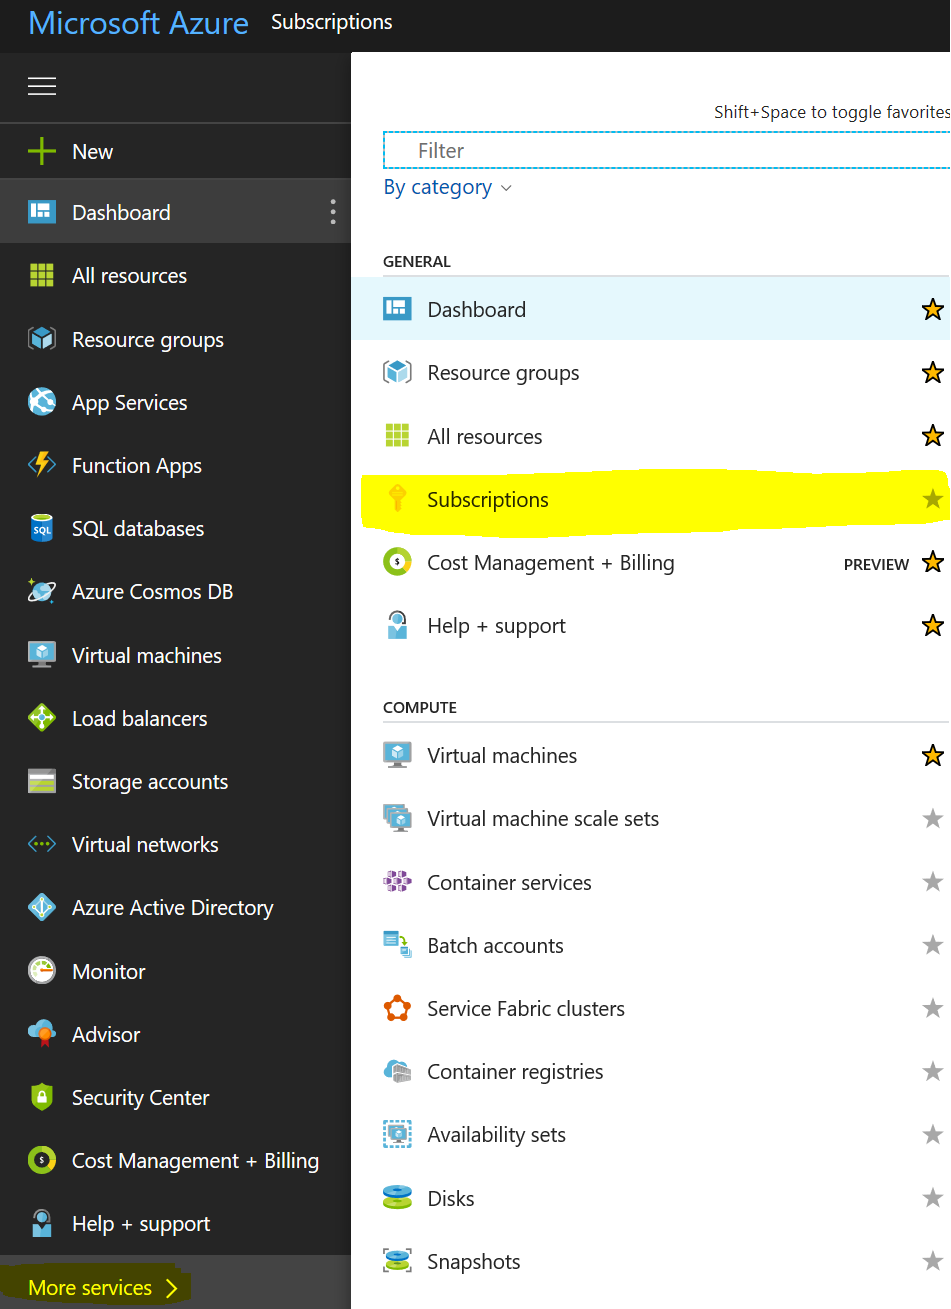
Ok, now that we got the required certificates from our own PKI infra, let’s get them to Azure. Logon to HTTP://Portal.azure.com.
On the left hand side, at the bottom select “More Services” and in the new window select “Subscriptions”.
Note If at this point, you don’t see any subscription, this means that you don’t have a valid Azure subscription to create virtual machines.
You can always , Add a “Pay-As-You-Go” subscription to test out the CMG functionality. You will only be billed for what you use and for a CMG, this cost is very limited !
In our test lab, running a CMG for a few clients, the cost was less than 100€ / month. The additional cost for more clients is just a bit of processing power and network traffic. Both very limited for a management point !!
Anyway, if you do have a valid subscription, or you just created one, note down the Subscription ID

Then, Select the subscription and in the new menu , select “Manage Certificates”
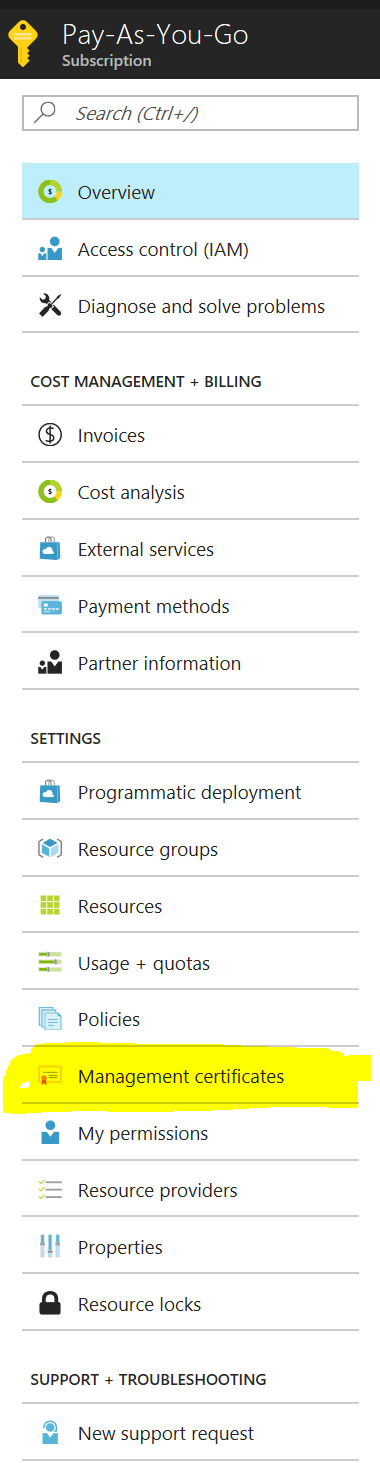
Click the Upload button and upload the “CER” version of your Management certificate we exported earlier. (the one without the private key)
Creating the Cloud Management Gateway service in ConfigMgr
Ok, with all prerequisites taken care off, let’s create ourselves a shiny CMG in Azure !
On your primary site, being it the latest tech preview or a production build (1706 or later) where you enabled the Cloud management gateway as a pre-release feature.
In your Configuration manager Admin-UI, navigate to the Administration Pane, Cloud Services, Cloud Management Gateway. Select “Create Cloud management Gateway” from the quick access toolbar.
Provide the subscription ID you noted down earlier and select the Management certificate with the private key (PFX-file) as the management certificate and click Next.
At this point you “allow” your primary site to make changes in Azure without using a username & password. These certificates replace user credentials if you will.

On the Settings page, ignore for now the “Service name”. This will be automatically filled in for you. (yes, it’s confusing with the exclamation mark next to it !).
Select your appropriate region and in the Certification file, provide the Cloud Management Gateway public certificate with the private key (PFX-file). (not the management one we used earlier)
Once you’ve selected the PFX file, the Service name and Service FQDN will be filled out for you.
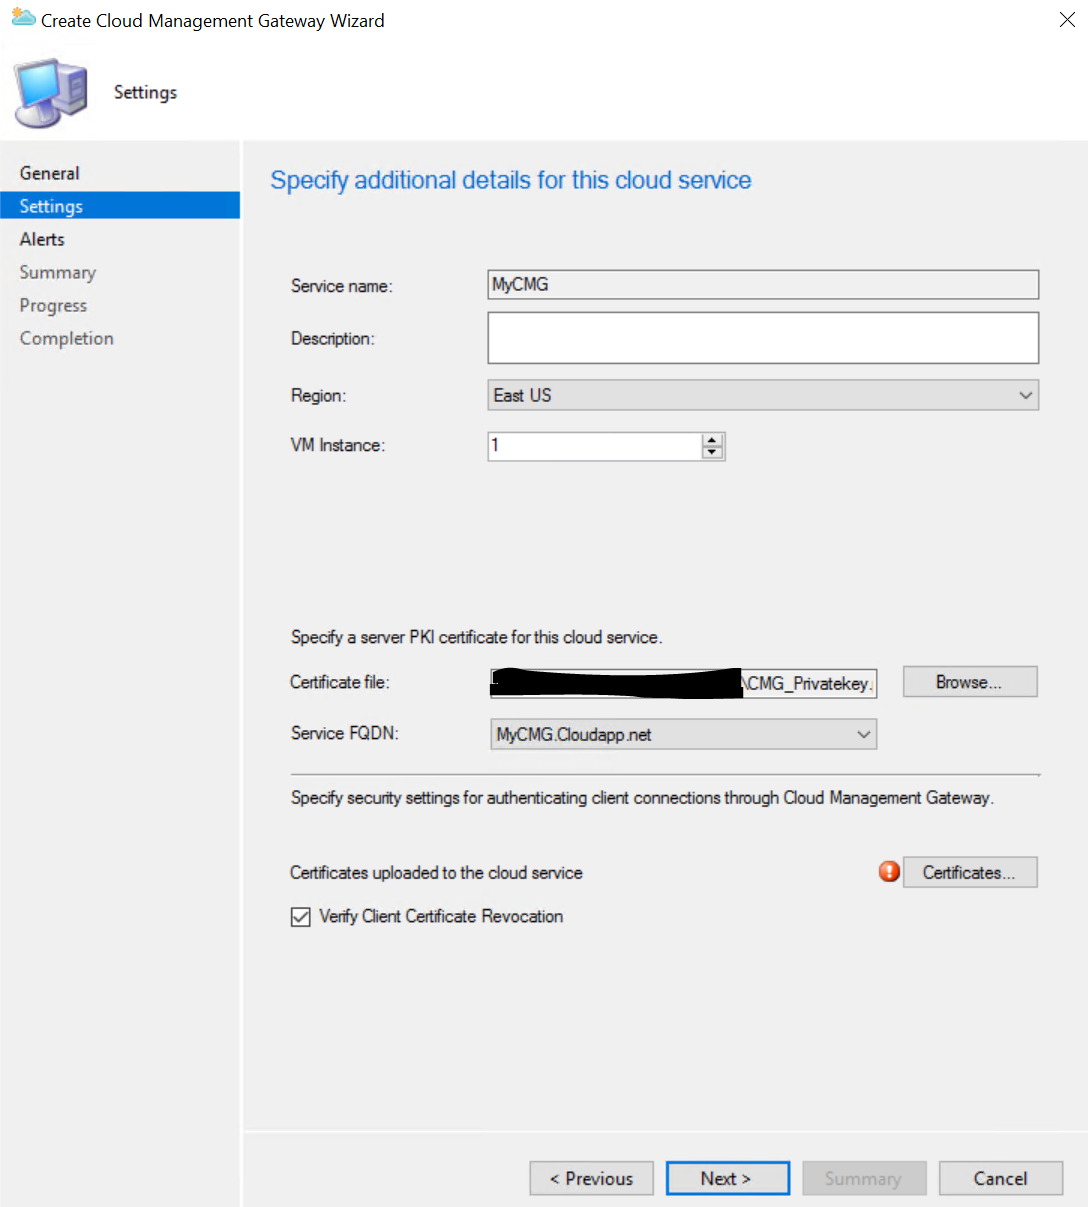
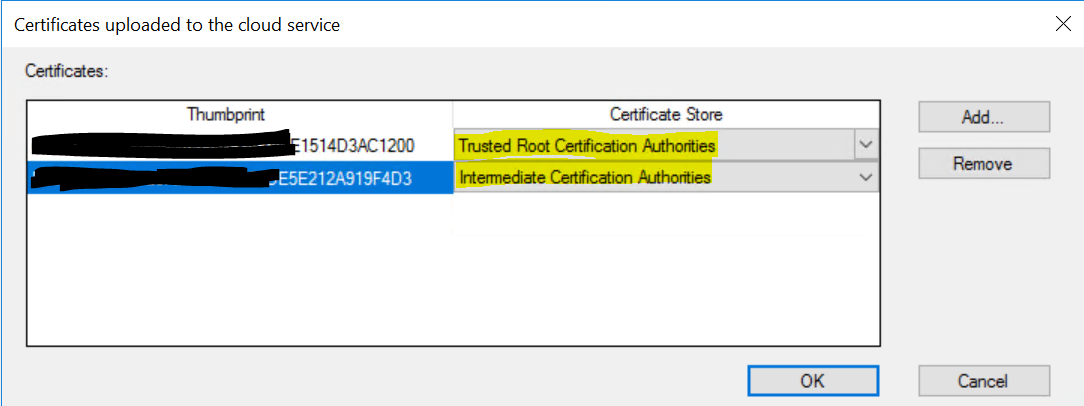
Still on that same Settings page, click the “Certificates” button and add your root and subordinate certificates (if appropriate). Make sure to select the appropriate store for each certificate. eg, Trusted root for your root and Intermediate for your subordinate. If your CRL’s aren’t reachable from the internet, make sure to uncheck the “Verify Client Certificate Revocation” checkbox.
Select OK on this screen and Next to continue the wizard.
Finish the wizard with the default settings (or adjust to your liking). Once the wizard is completed, the creation of your virtual machine in Azure will start. This will take some time and in your Admin-UI it will show as “Provisioning” for status.
Note At this point in time, a “classic service” deployment, which includes a virtual machine will be created. In one of the following releases of ConfigMgr Current branch, we expect that the newer ARM based objects will be useable. The result of this, for now, is that if suspend your CMG functionality from the ConfigMgr Admin-UI, you will still be charged for the virtual machine itself even though it is turned off. This should be different for the newer Azure Resource manager based resources.
You can rely on the CloudMgr.Log file to check what is happening in the background or for troubleshooting if something fails during setup.

During Provisioning, we can continue with the rest of the setup.
Next step is to add a Cloud management gateway connection point. In your Admin-UI, navigate to the administration pane / Site Configuration / Servers and site system roles and right-click your primary site. Select “Add site system Role” and select the box next to “Cloud management gateway connection point”.
The log file for this specific role is called “SMS_Cloud_Proxyconnector.Log”
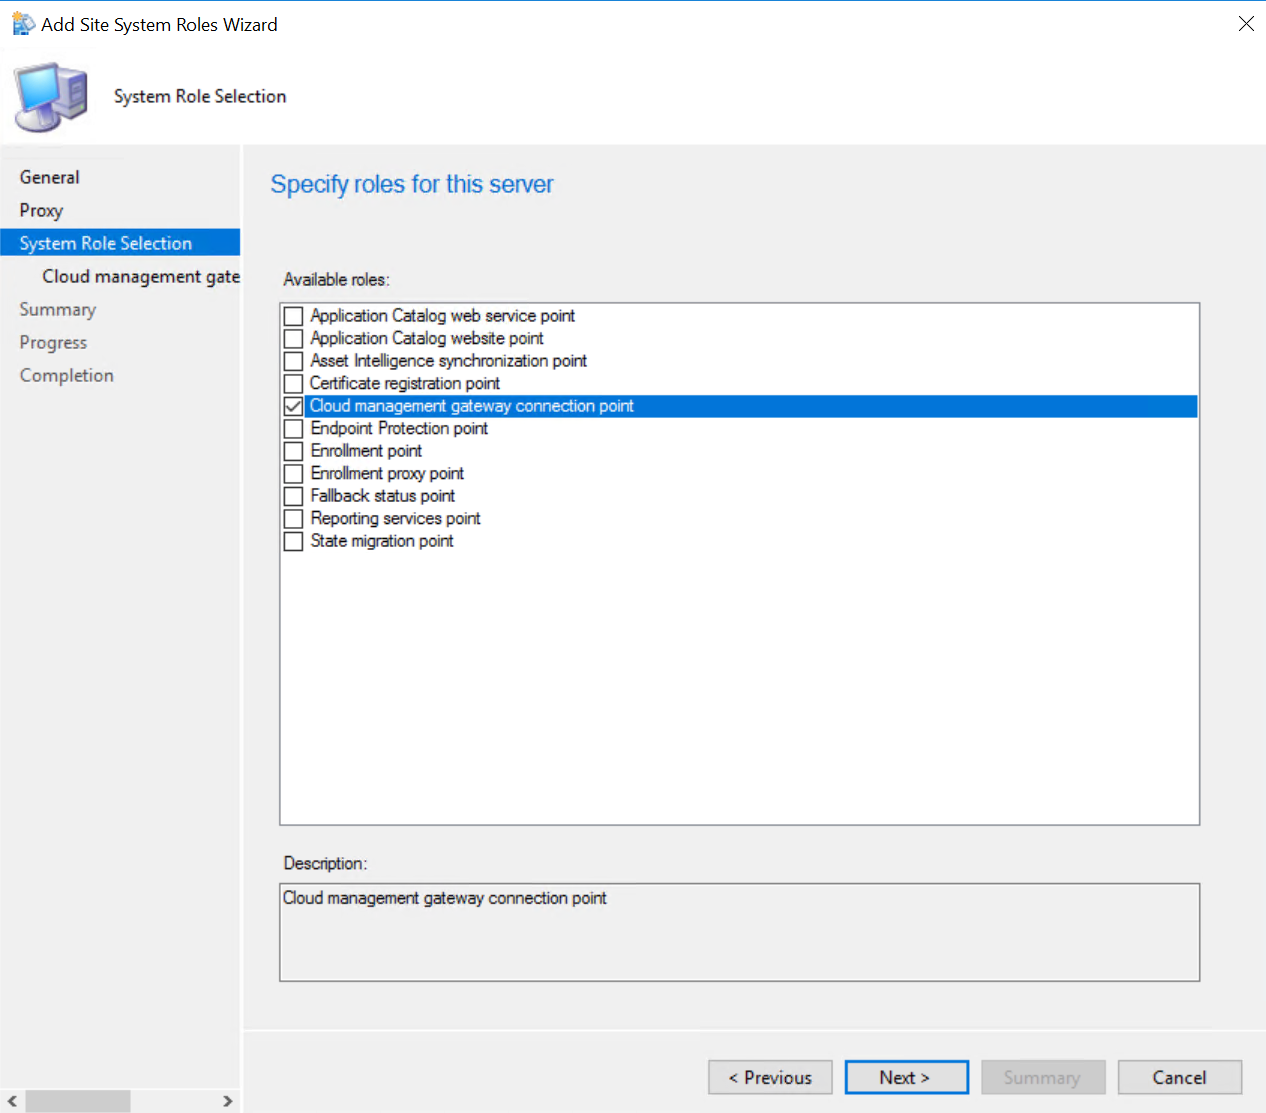
Just complete the wizard. All details should be pre-filled out.
In the Site System roles pane find the Management point role and Enable the checkbox for Allow Configuration Manager cloud management gateway traffic.
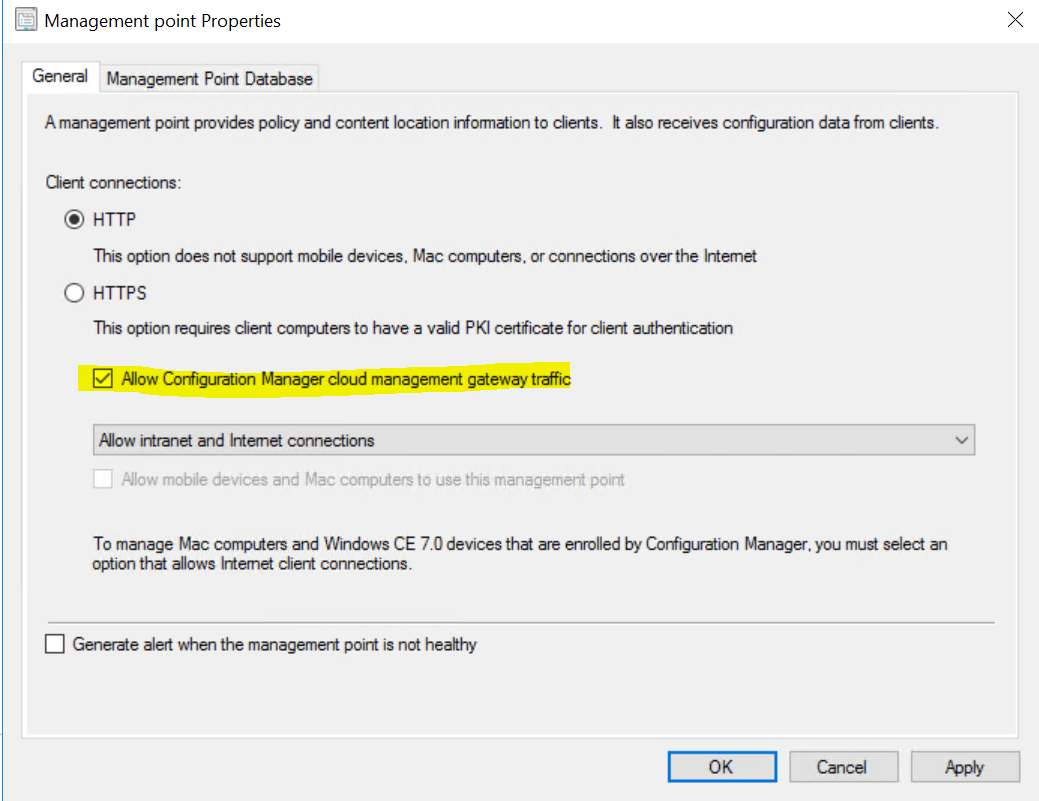
Repeat this process for the Software Update Point (if wanted/needed).
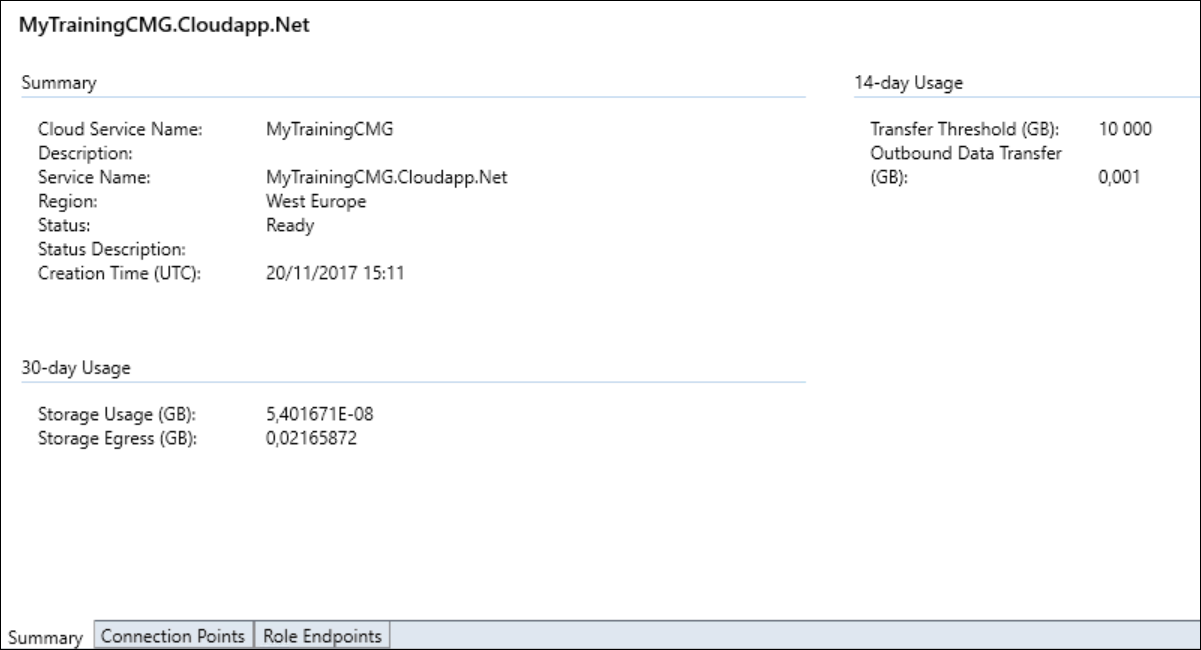
With a bit of luck, the creation of our CMG virtual machine in azure is ready in the meantime. The status should display “Ready” in the cloud management gateway node.
Side-Track
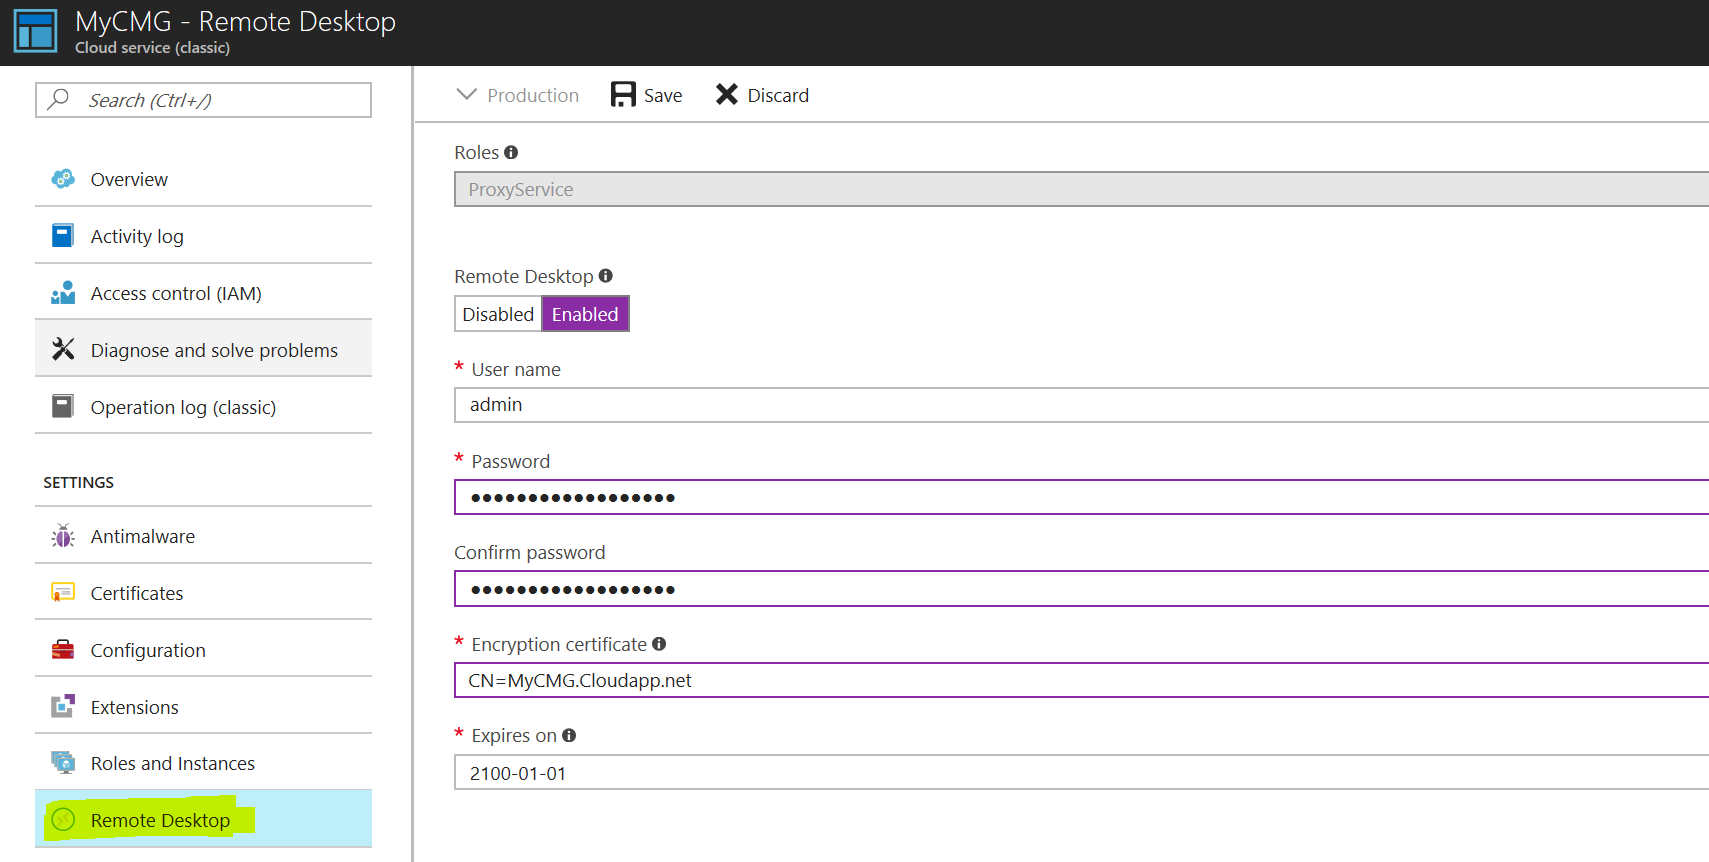
Given that our Cloud management gateway is an actual virtual machine in Azure, it could come in handy if we could log on to it for troubleshooting purposes. In order to do that, we need to enable the RDP service.
In your azure subscription, check the “All services” node. You should see there a “Cloud Service (classic)” entry for your CMG. Select it.

In the new menu, select “Remote desktop” and set it to “Enabled”. Provide a username & password and save the account.
Now, in order to log on to this virtual machine, you can’t simply start an RDP session to the public IP.
Once you selected your CMG, on the overview pane, you should see a “ProxyService in 0” with the status “Running”.
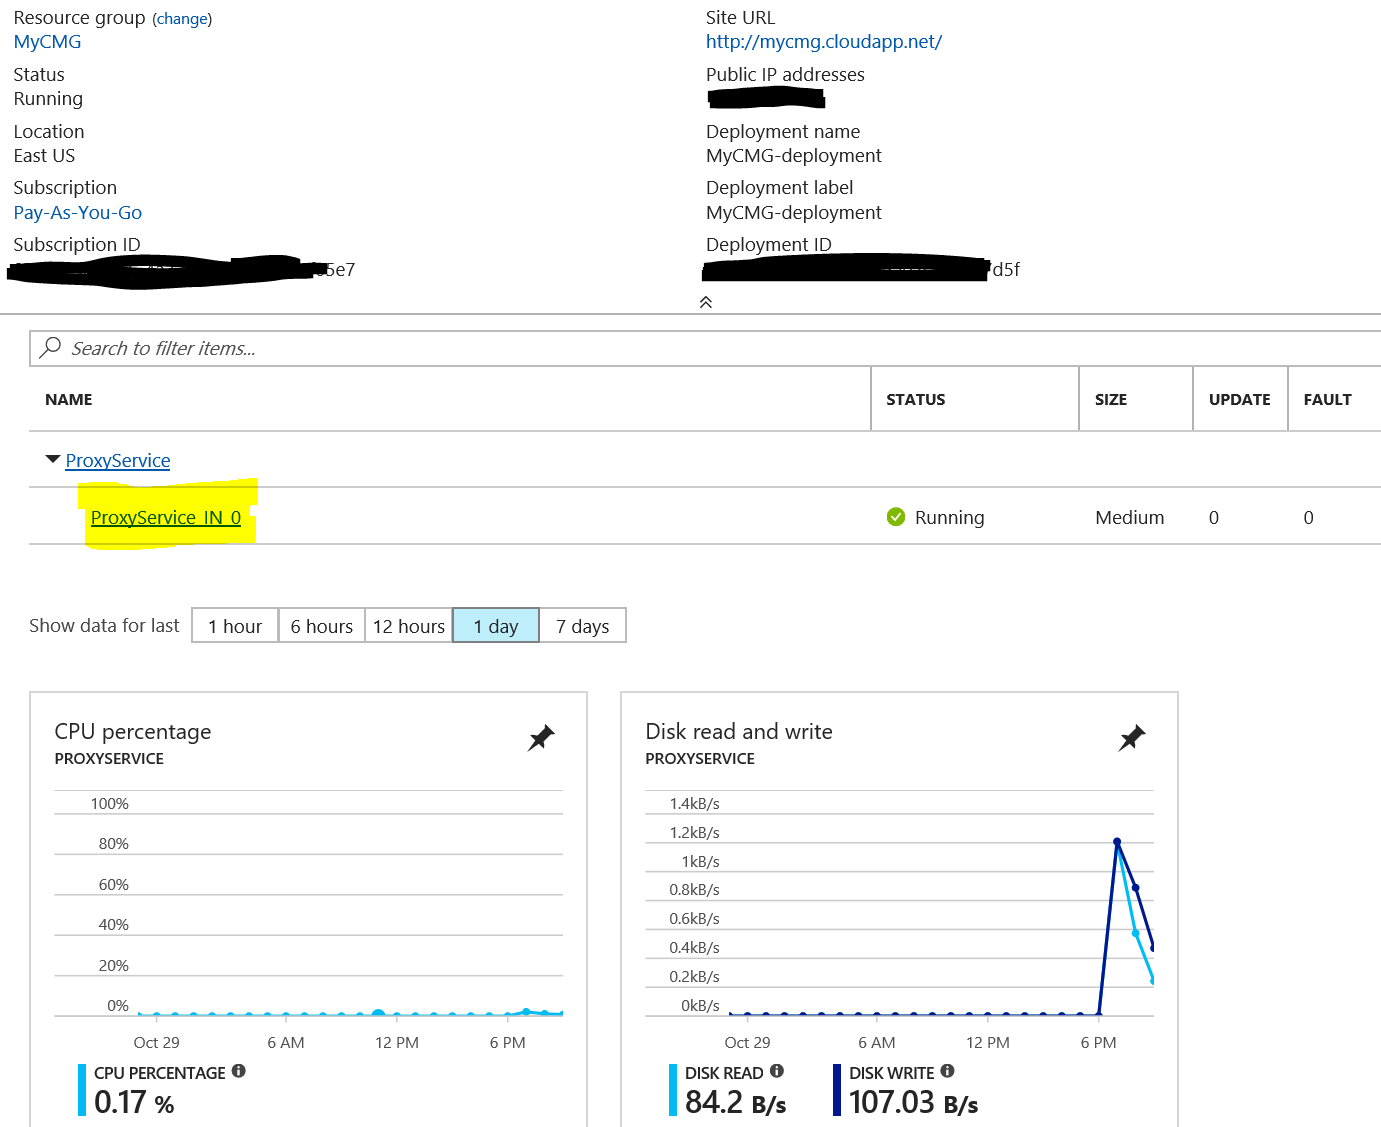
Click that link (the Proxyservice in 0) and then you can click the Connect button. This will download a .RDP file that you can use to start an RDP session to your CMG.
Provide the username and password you created earlier and you should be presented with , in my case, the desktop of a Server 2012 R2 machine.
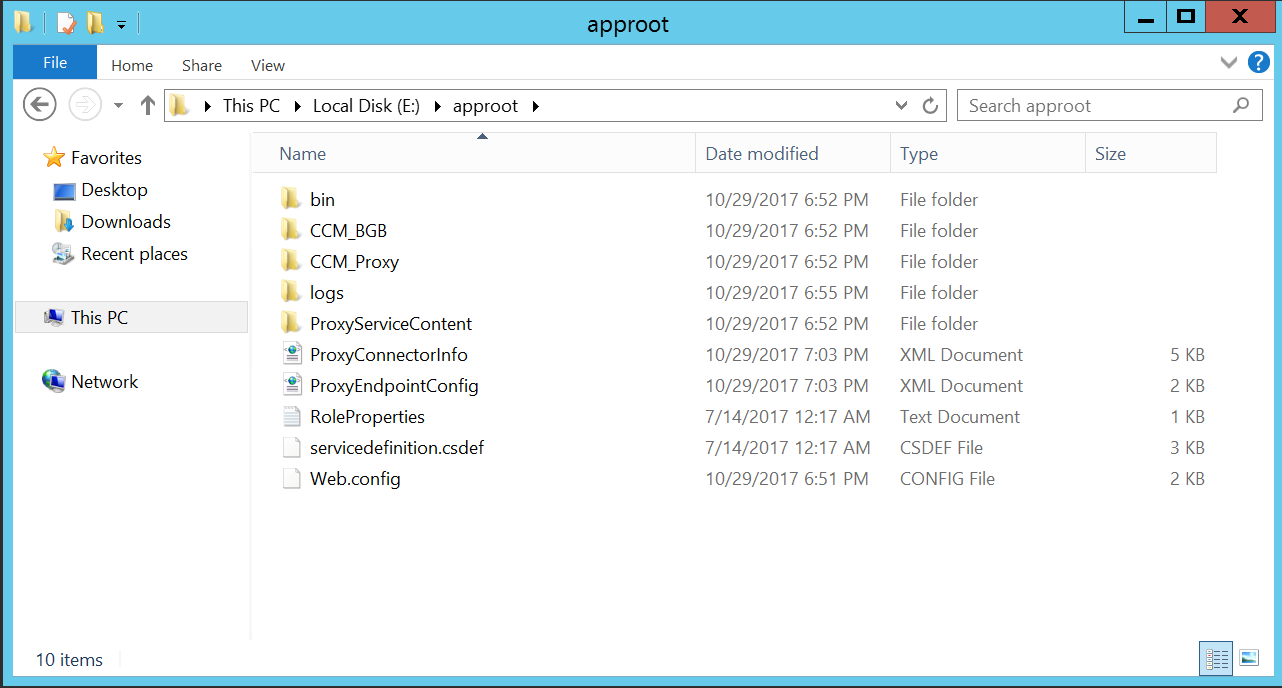
On the E-Drive there is a folder called “Approot” that seems to hold most of the CMG related components and logs.
Depending on what you are trying to troubleshoot, it could also be interesting to take a look at the IIS logs. In my case those were found on D:\Inetpub
Verifying CMG Connectivity
Since our clients will use the CMG if they are on “the internet”, they will need some form of authentication. This is possible in 2 ways. Either you can use client certificates, delivered by the PKI infrastructure we already have in place or we can use Azure AD token-authentication. For now, this specific post will focus on using client certificates. A follow up post will come later explaining the same process using token authentication.
There are 2 ways your client will know about the existence of your cloud management gateway. They will either receive this information when they are on-premise during a regular policy-request, or you can use a specific command line to (re-)install your client and make it CMG-aware. This could be useful if a client has no access to on-premise infrastructure.
Make sure your test-client has a computer certificate delivered by the same PKI infrastructure you used to generate the public and management certificates for the CMG and that you have requested policy after your CMG came online.
You can verify that your client is aware about the existence of the CMG by running the following PowerShell command from a client :
gwmi -namespace root\ccm\locationservices -class SMS_ActiveMPCandidate | Select-Object -Property MP
The output should show you all available management points including the CMG

Once you verified that the client is “CMG-Aware”, switch it to a public internet connection and verify connectivity again.
note Once in a while I hear people asking how a client determines if it is on-premise or on the internet. The simple answer is that a client will try to resolve your Global Catalog Server (AD). If that is possible, then it will assume it is on-premise, if not, it will be on the internet.
You can verify connectivity to your CMG by using the following PowerShell commands (obviously replace the URL with your own DNS entry for your CMG)
$cert = ((gci Cert:\LocalMachine\My) | ? {$_.EnhancedKeyUsageList -like '*Client Authentication*'})
Invoke-WebRequest -uri "https://MYTRAININGCMG.CLOUDAPP.NET/CCM_Proxy_MutualAuth/72057594037927939/SMS_MP/.sms_pol?SRC10000.SHA256:2D59C6D6AE51F38C7B179E794AECE84753BAE08C5A85111176BE01D02B1A1912" -Certificate $cert
If the entire setup was successful, you should see the following result
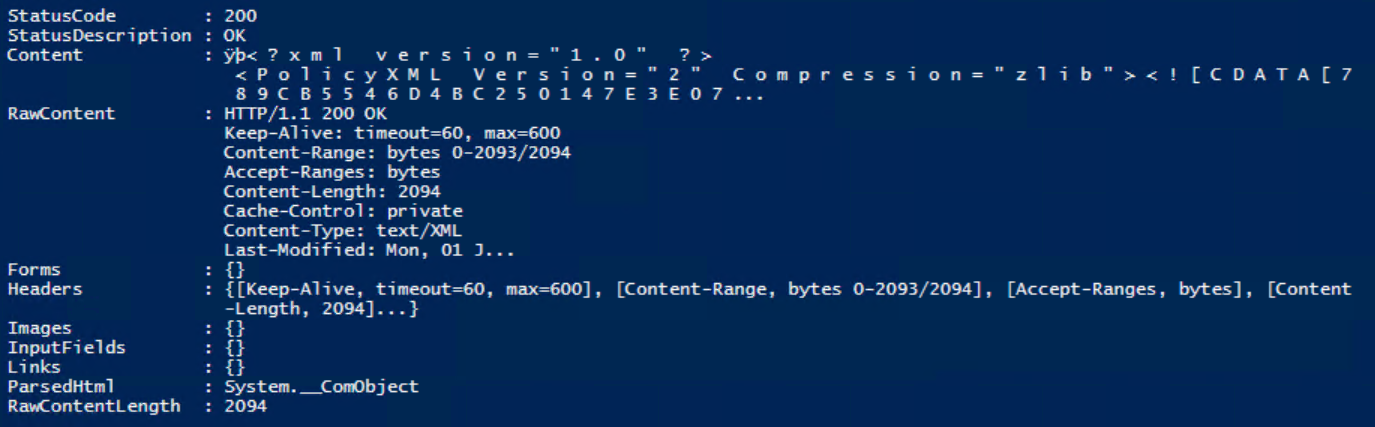
What you have done in reality, is request a valid policy (just like your client would if it were on-premise). This specific policy that we requested is one that is available (and identical) on every ConfigMgr environment.
note You can actually use this same policy request against every MP as a way of validating that your MP is working properly !
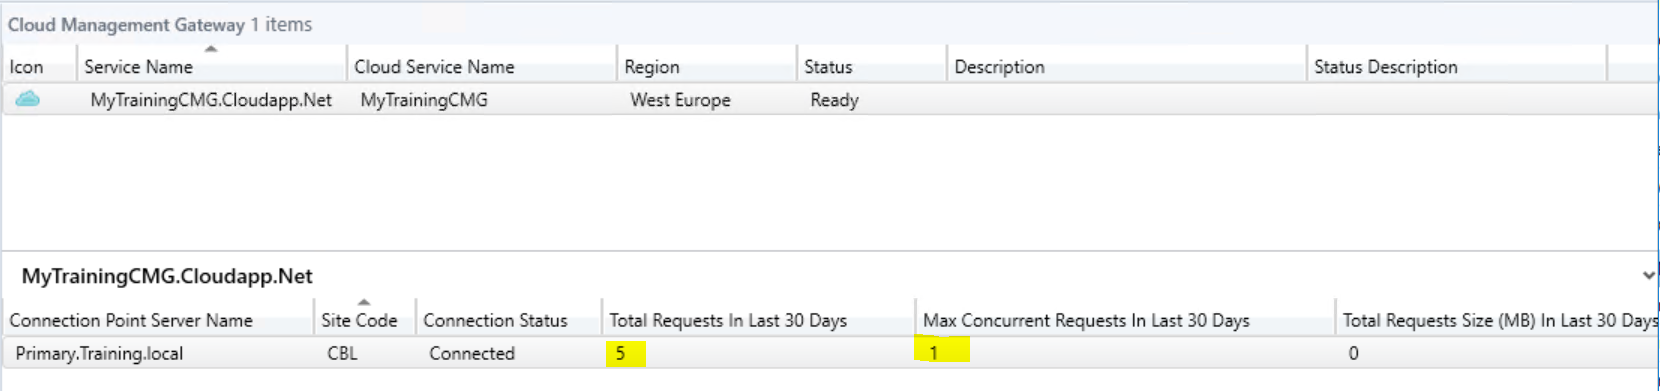
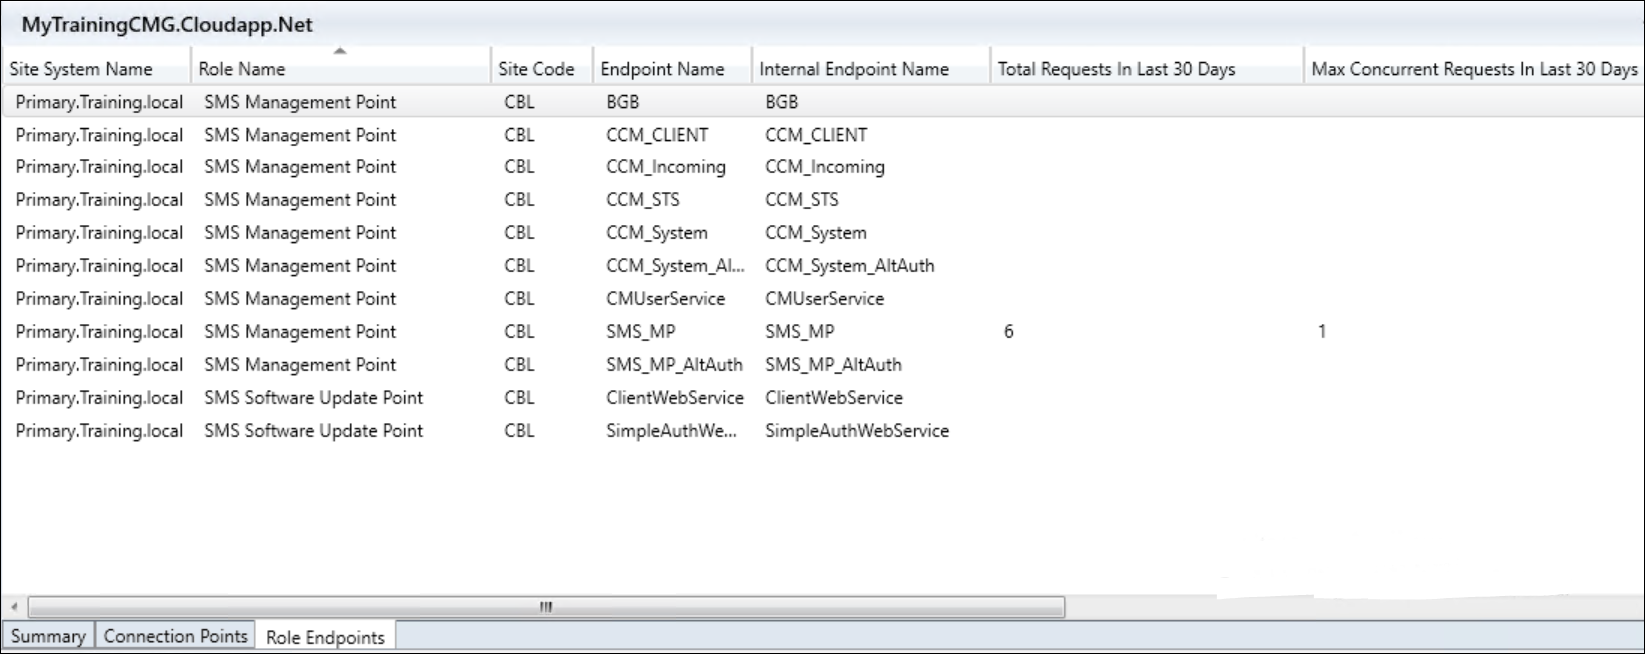
On your Primary site, if you would check back to your cloud management gateway under the Administration Node, you would equally see there that some requests came through.


Leave a Comment