
Powershell App Deployment Toolkit - GUI (Updated version 1.4)
GUI for creating Intune & SCCM applications using the Powershell App Deployment Toolkit, including creating Software ID Tags for easier License Management.
Intro
If you are working with ConfigMgr or Intune, you will probably create Applications once in a while to deploy to end-users machines :)
Although the current Application model is great and allows for much greater flexibility than we had with Packages/Programs , there are still situations where the Application model isn’t sufficient.
A lot of the things that are not possible with the App model, are probably fixed in your own environment by writing custom scripts.
A very good alternative is to start using the Powershell App Deployment Toolkit.
It is basically a (free) solution that allows you to standardize the way you deploy applications (and packages if you want to). It offers great flexibility and takes away most of the gaps that are left in the app-model.
Some of it features are :
- An interface to prompt the user to close specified applications that are open prior to starting the application deployment
- The ability to allow the user to defer an installation X number of times, X number of days or until a deadline date is reached
- The ability to prevent the user from launching the applications that need to be closed while the application installation is in progress
- Balloon tip notifications to indicate the beginning and end of an installation and the success or failure of an installation.
- and many more
However, if you have never used it before, it could be a bit overwhelming at first since there are so many different options available.
The GUI
One of the issues I ran into when using the toolkit for the first times, besides finding out what option I needed, were typo’s…if you forget a quote, the script won’t run. Additionally, editing the Deploy-Application.PS1 file takes time as you have to scroll a lot to the correct location to perform the functions that you want/need.
To prevent this, I started this project to create a GUI that does most of the legwork for you.
At this moment the functionality is still limited but it should cover the basics to deploy an MSI or Script (setup.exe). The goal is to extend the GUI so that most of the functionality offered by the toolkit is present in the GUI, but that will take time ;-)
For now, see it as a tool to merge your source-binaries together with the toolkit and generate the “basic” Deploy-Application.PS1. Once that is done, nothing is stopping your from editing that file to embed more complex stuff. Also, feel free to update the AppDeployToolkitBanner.png in the Toolkit subfolder with your own company logo !
The functionality at this point in time is (Version 1.2) :
- Fully unattended generation of the Deploy-Application.PS1 file
- Merging of your source binaries with the PS App toolkit on a destination Share (must be UNC)
- Creating the SCCM Application + Deployment Type
- Adding a Software ID tag and using this as a detection mechanism (with experimental lookup function).
- Caching of previously looked up Reg-ID’s and previously used source & destination paths
- Enumerating all DP & DP-Groups and distribute content to them
- Generate Install & Uninstall collections based on the Application’s Name
Added functionality in Version 1.3 :
- If enabled, the tool can now automatically connect to your SCCM environment, create the application, collections and distribute the content (saving you clicks and time)
- If the PoSh AD module is available, the tool can now create the AD security groups and link them to your collection
- A text message can be shown at the end of an installation
- Bugfix where uninstallation wouldn’t delete the RegID file.
Added functionality in Version 1.4 :
- Browse to your setup files (this will extract relevant information from the MSI/EXE and populate the necessary fields)
- Create Intune Win32 package (IntuneWin file)
- New/Fixed whois lookup information for the SWID Tag
- Latest PSADT & Intune Win32 app binaries are included
- Additional errorhandling
- Runs from any location that has the Configmgr AdminUI (Console) installed
- Vendor name is removed in collection/AD name (to shorten the name)
- Suffix install/uninstall is replaced by -I/-U (to shorten the name)
- Bugfix if no parameters are required or script or MSI
Pre-requisites
Disclaimer : As this is the first (beta) version of the GUI (don’t let the version number fool you), not everything is error-handled. Also, this is my first attempt at such a project and I’m not the best PowerShell coder out there anyway ;-) So it’s a “learn as you go” project.
For now, I assume that the account that launches the GUI has access to the folder that holds your source binaries (the files you want to install) and to the UNC path where we will copy the merged application to (explained below).
You should be able to run the GUI from any device that has the configmgr AdminUI (Console) installed.
Logging is included in the GUI and if you have PowerShell 5 (or greater), it will try to install Kim’s Logging module so that logging is done in the CMtrace format. If that fails, logging will be done to a regular text file.
The location of the logs for now is c:\temp\PSAPPgui
Using the GUI
First things first, Download the GUI to a location of your liking. That should include the following files/Folders :
- Toolkit (subfolder - holds the full PS App deployment toolkit)
- Intune_Win32 (subfolder - holds the Intune Win32 conversion toolkit)
- Config (Subfolder - holds the following files)
- Deploy-Application.PS1 (The template I build upon)
- MainWindow.XAML (My GUI file)
- OSCCLogo.jpg (needs no further explanation)
- Prefs.XML (caching of user settings)
- SWID.XML (caching of regid’s)
- PSAPP_GUI.PS1 (The file you need to run !)
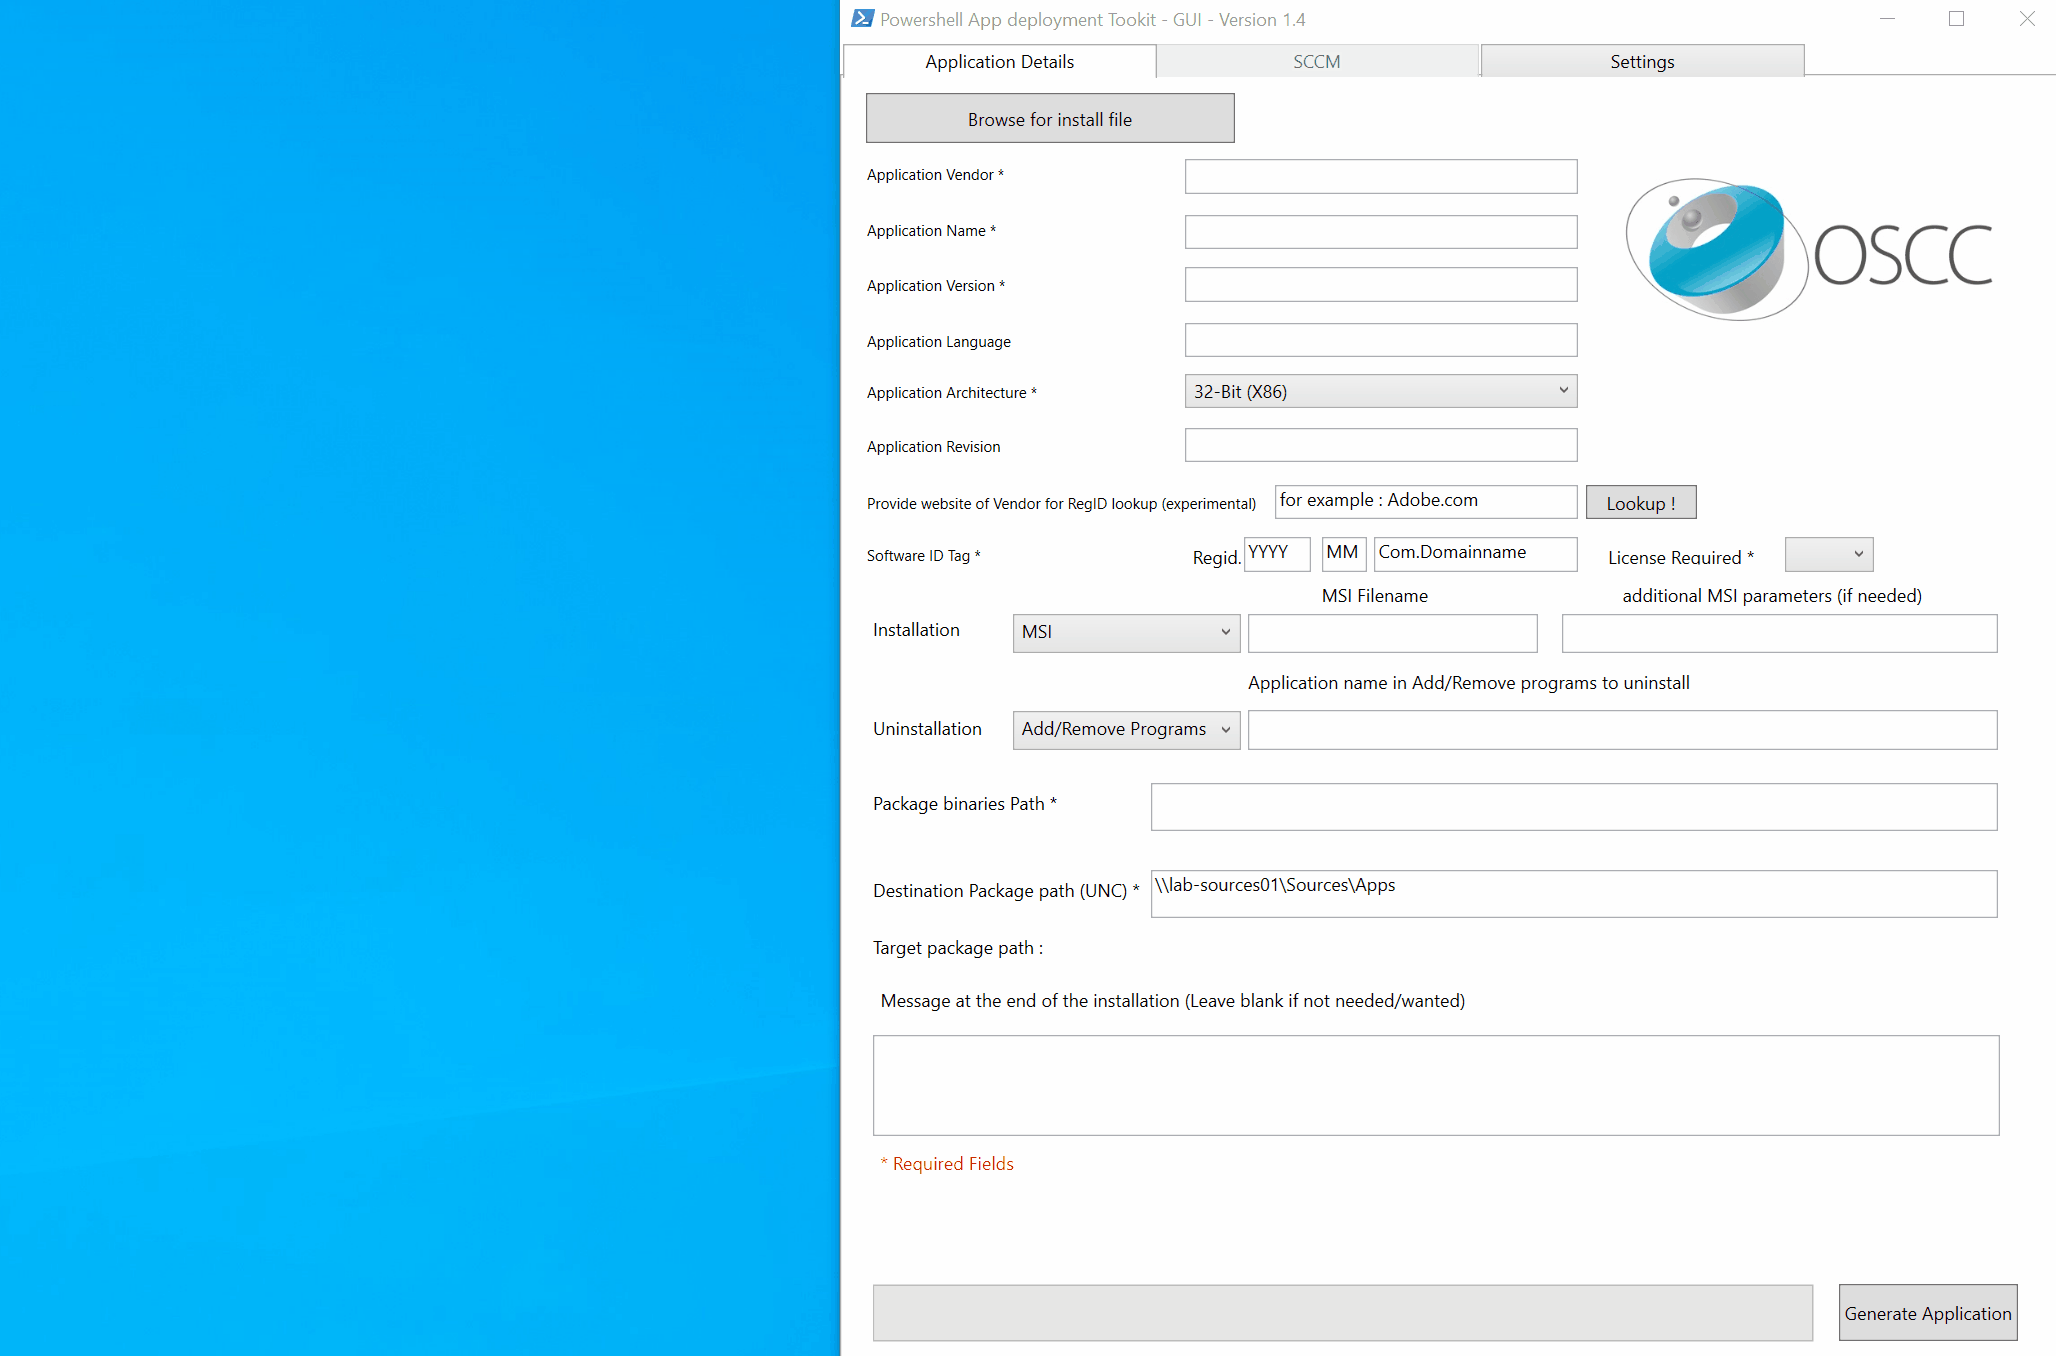
When you start the GUI (by launching PSAPP_GUI.PS1 from a PowerShell cmd prompt) you should see the interface that allows you to create a new application. (Run as administrator the first time to allow the logging module to be downloaded/installed. This is not required for the GUI functionality but might throw some errors because it will tyr to install the logging module)
To use the tool, the easiest way is to click the “Browse for install file” button at the top. Browse to the MSI/EXE you want to install and select it. The tool will try to extract as much information as possible and enter it in the appropriate field. You may need to complete the remaining required fields.
These are the required fields :
- Application Vendor
- Application Name
- Application Version
- Application Architecture
- Software ID Tag
- Source Path
- Destination Path
The first 4 should be self-explanatory and are all related to the application you want to “package” and deploy with SCCM. I’ll cover the Software ID tag later in this blogpost. (See the animated gif in the beginning of the blogpost for a demo)
On the Installation section, there is a dropdown box to allow you to switch between MSI or Script.
Installation
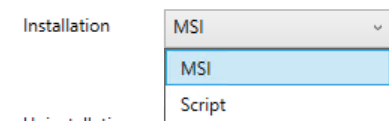
MSI
Enter the full filename of the MSI you want to install, eg 7zip.Msi and in the parameters box the MSI parameters you want to apply, eg /passive or /qn.
Script
for Scripts (or .exe based installs) the process is similar. Provide the filename that you want to run, eg setup.exe and the parameters to have it unattended (eg, /S).
Uninstallation
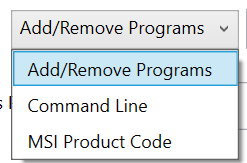
Add/Remove Programs
In the Uninstall section, provide the name for the application as you see it in Add/Remove Programs, eg “Adobe Reader X”. The App deployment toolkit will do a search for that name and perform the uninstallation.
Command Line
If needed, provide the full uninstall command line, eg “Setup.exe /uninstall”.
MSI Product Code
You can also use the MSI product code for uninstallation.
Source & Destination

In the Package binaries path, provide the full path to where your source binaries that include the setup file you provided earlier are stored. This can be a local or network path.
The destination package path must be a network path (\server\share). The GUI will create a subfolder there with the name of the Vendor and a subfolder in there with the name of the Application + Version
In my screenshot the result would be \SCCM_Server\SCCM_Files\Applications\Vendor\Applicationname_Version_Bitness
Note : Bitness = Application Architecture = X86 or X64
The actual toolkit will be copied into that final subfolder and your application binaries in the “Files” subfolder of the Toolkit
The Buttons

Clicking this button will allow you to browse to your sourcefiles that you want to install and extract as much information as possible.

If you provide the URL of your vendor’s website, eg adobe.com and click the lookup button, the GUI will try to detect when that website was registered and pre-fill the RegID information.
Most domains should be supported, but the lookup can only handle 1000 requests/month globaly (Proxy-support is not built-in at this moment)

Clicking the “Generate Package” button will first “validate” all the fields and highlight in Green what is Ok and in Red what is not OK.
Nothing will happen until all required fields are filled out properly.
Once that is done, the GUI will create the subfolders as explained above and merge the files and finally it will generate the Deploy-Application.PS1 file that will contain the installation logic.
After that, the 2nd tab becomes available for you to continue the SCCM-Part.

Click “Connect to SCCM” to automatically connect to the detected SCCM Environment. Once that succeeds, all DP’s (and groups) will be enumerated and you will be able to progress with the import.

“Import into SCCM” will then create the application + deployment type using the information provided in the GUI.
As a detection method, we check for the presence of the SWID-Tag file. Since it’s generated after a successful installation, and removed again on uninstallation, it’s safe to use this and removes all complexity on finding an appropriate detection method.
The list of DP’s and DP-Groups is multi-selectable, so just hold CTRL and select the DP and/or DP-groups you want to start the distribution to and click “Distribute Content”
Finally, you can generate 2 collections based on the Application-Name with the suffixes “-I” & “-U”. They can be further customized with a pre & suffix of your choice.
Settings
The Settings tab is split in 2 sections. The first part are the generic settings that you can enable or disable. It will tell the GUI to remember some items and re-use them in the furure
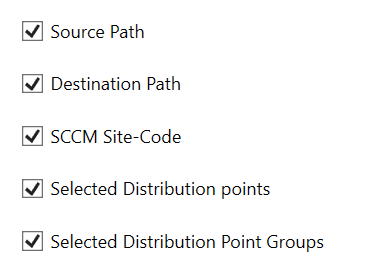
The other part will initially be greyed-out. To be able to select those items, you must complete the first and second tab “manually”. That is, create the PSADT package on the first tab and on the SCCM tab, click connect and create the SCCM Application. At that point,the GUI will cache the SCCM sitecode, the DP’s you selected, if you want to create collections … The next time you create a PSADT package. The tool will automatically connect to SCCM and create the application on your behalf with all your previous preferences.
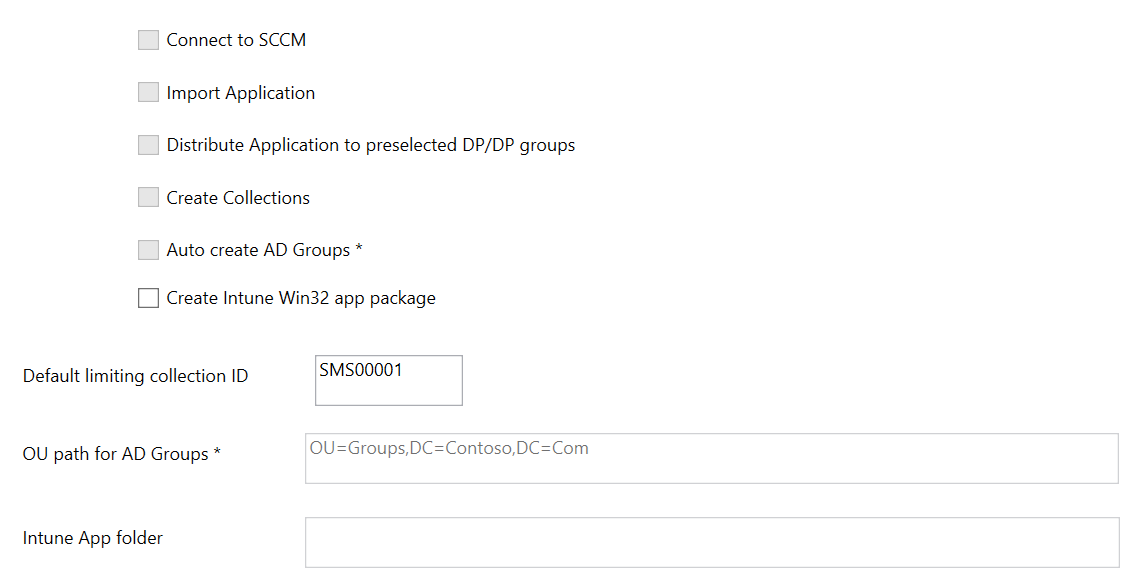
By default, the tool will limit the collections to the “All systems” collection. If you dont want this, you can set the collection ID to a collection of your liking.
If you select the “Create Intune package” checkbox, you also need to provide a target “Intune app folder”. Once the PSADT Package is fully created, it will also generate the IntuneWin file for you in that target folder. This will include the details needed to create the Win32 app in Intune (Commandline, Detection method,…)
Don’t forget to hit “Save” to actually save your settings.
Software ID Tags
A software identification tag is an XML file that’s installed alongside software, and which uniquely identifies the software, providing data for software inventory and asset management. With the introduction of industry-standard software identification tags, it becomes possible to automate the processes of gathering software inventory data for use in reporting and in other initiatives such as managing software entitlement compliance.
Software identification tags are stored on the computers on which software is installed. The standard allows for operating system vendors to specify where software identification tags are located. On Windows Vista machines and later, SWID Tags are stored under %Programdata%\
One of the key-elements of the software ID tag is the “RegID-File”. The file is generated based on when the domain name from the vendor of the application was first registered. Eg, if we lookup “Adobe.com” on www.whois.net, we can see that it was first registered/created on November 1986.
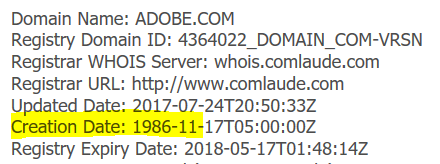
The SWID-Tag will be stored in a subfolder under %programdata%. This subfolder for Adobe will be : Regid.1986-11.Com.Adobe
This will always be the structure. It starts with the word “RegID” followed by a dot “.”, then the year when the domainname was first registered, a dash “-“ and the month when the domainname was registered. Then another dot “.” and finally the domainname in reversed order. If we take www.Oscc.Be as an example, the subfolder would be : Regid.2008-03.Be.Oscc
The key here is obviously to look this information up properly so that all applications from a specific vendor will always end up in the same subfolder.
In that subfolder, the actual SWID-Tag will be created. The file starts with the same string as the subfolder, followed by and Underscore, the Applicationname, another underscore and the application version. The extension of the file is .swidtag
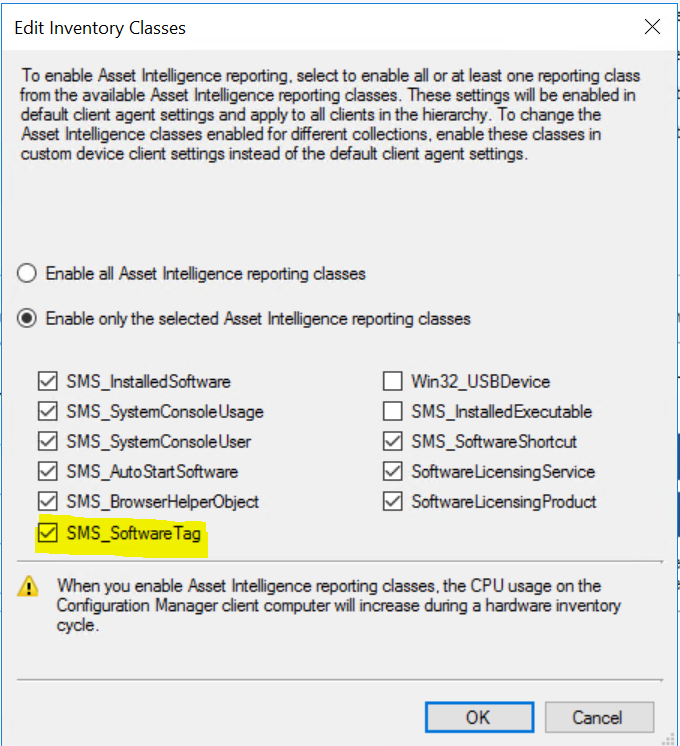
Basically this is just an XML file that contains a few details on your application. SCCM Will automatically pick up these SWID tags if you enable them in the Asset Intelligence node.
Enable the inventory class “SMS_SoftwareTag” and once the data is collected you can run reports 14A, 14B & 14C that are specifically created to handle SWID-tags.
Back to the GUI. With all the information it should be clear what needs to be filled out in the Software ID Tag fields. Look up the domainname for your vendor, enter the year, month and domainname in reverse order.
When you select “License Required : No”, a flag will be set to “False” indicating that this is software that is free to use. If you select “Yes”, the SWID-tag will be created with Entitlement Required = True, indicating that a license is needed.
By default, the powershell App deployment toolkit doesn’t support the creation of SWID-tags, but Kim wrote an extension (that’s included with the GUI) to enable this functionality.
That should be all there is to it ! Again, for now it only supports basic functionality but once you have your destination package generated, nothing is stopping you from opening up that freshly generated Deploy-Application.PS1 file and making the adjustments you want/need.
Roadmap
Currently on my roadmap for future versions (not necessarily in this order)
- Create Deployments
- Create AD-Groups and link to Collections (done in 1.3)
- Saved settings such as target folder, selected DP’s, … (done in 1.3)
- Browse buttons (done in 1.4)
- More Built-in Toolkit actions
- Multi-threaded GUI
Bugs
- The GUI can become unresponsive when copying large files or importing into SCCM. Be patient as the process is running in the background in single-threaded mode.
Download
Current Version : 1.4
Feel free to add ideas for features that you feel are missing badly and let me know if you run into issues using the GUI.
Shoutout to Kim Oppalfens and Sandy (Yinghua Zeng) for testing the functionality!
That’s it ! Enjoy …


Leave a Comment