
Enabling more logging on Configuration Manager (server & client side)
Intro
During the “Top CSS cases at Microsoft” session in MMS 2017, I gave a quick demo on how to enable more logging in Configmgr server & client side and starting/stopping individuel server side components. As this wasn’t properly detailed in the slides, I promised to document this in a blog-post.
Client Logging
Modifying logging details in Microsoft Configuration Manager (Current Branch and earlier versions) is managed by adjusting the registry.
In that registry, any client related details are found under :
- HKLM\Software\Microsoft\CCM
If you would ever need to manipulate the registry settings of a management point (or crank up the logging level for that MP), it would be under that same \CCM registry key as a management point is built on “client technology”. This equally explains that if a configmgr client is installed on a MP, you wouldn’t find the (client) log files under C:\Windows\CCM\Logs but rather under C:\Program files\SMS_CCM\Logs as they share code behind the scenes.
Back on track. To get more detailed logging we need to update a few settings in the registry. Navigate to the following key :
- HKLM\Software\Microsoft\CCM\Logging\@Global
That key should contain the following Dword-values with a default data setting :
- LogDirectory (C:\Windows\CCM\Logs)
- LogEnabled (1)
- LogLevel (1)
- LogMaxHistory (1)
- LogMaxSize (100000)
We are particulary interested in “LogLevel” (with a default value of 1). Updating that value to “0” would make the Client (and MP) logs a lot more verbose. You could also update the LogMaxSize if you feel the logfiles are rolling over to fast but keep in mind that CMTrace struggles to manipulate large log-files.
However, updating just that one value isn’t enough on the client. You also need to create a new registry key under HKLM\Software\Microsoft\CCM\Logging called “DebugLogging” (make sure to create that new KEY directly under HKLM\Software\Microsoft\CCM\Logging and NOT under HKLM\Software\Microsoft\CCM\Logging\@Global)
- ‘Right-click the Logging-subkey, select New and then Key’ and change the name to “DebugLogging”
Under that newly created key HKLM\Software\Microsoft\CCM\Logging\DebugLogging, create a new ‘String’ Value with the name “Enabled” and a value of “Yes”. Once that is done it should look like this

All you need to do now is restart the SMS Agent Host service for it to take effect !
As always, manipulating the registry has a certain risk so make sure to have a good backup before you make those modifications. Also enabling verbose/debug logging adds overhead to your client so only enable it when it’s necessary and make sure to undo you changes once troubleshooting is done.
Server Logging
Enabling debug/verbose logging on the client is an “on/off” thing, however on the server side we get more granular control. The registry key that we are now interested in is HKLM\Software\Microsoft\SMS
A lot of (sub-)components host their settings in this key as well, so the warning when manipulating the registry is even more important here ;-)
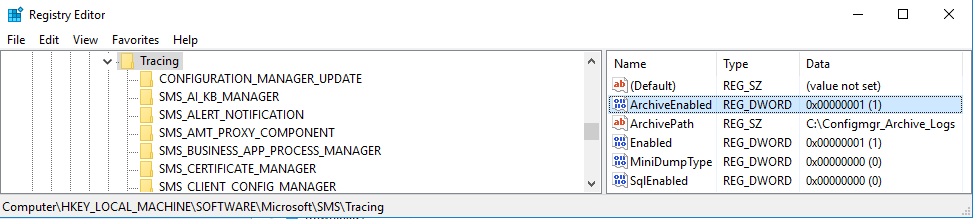
All logging related settings are in the subkey Tracing (HKLM\Software\Microsoft\SMS\Tracing)
The Tracing key itself already contains a few interesting values :
- ArchiveEnabled (0)
- ArchivePath (empty)
- Enabled (1)
- MiniDumpType (0)
- SqlEnabled (0)
As you probably know, Configmgr server logfiles have by default a history of 1 file, this results into one ‘.log’ file and one ‘.Lo_’ file. However as we will see a bit later, the default history setting is 10. So where are those other files stored? Or how can we see those 10 history files ?
The answer is “ArchiveEnabled & ArchivePath” :
- Start of by creating a local file-system folder that will hold the additional logfiles (eg: C:\Configmgr_Archive_Logs)
- Update the “ArchivePath” value with the full path you just created
- Update “ArchiveEnabled” from 0 to 1
The result should be similar to this
Additionally, if you would flip the ‘SqlEnabled’ from 0 to 1, you will get the SQL code that is executed whenever a certain component kicks in action. The difference with the SMSProv.Log ,that equally holds SQL queries, is that SMSProv.log only logs the SQL statements that are used to eventually display something in your Admin-UI. Flipping this SqlEnabled value to 1 does more or less the same thing, but for each individual component except the Admin-UI.
Warning : Enabling SQL-Tracing will generate A LOT of additional entries in your log files, so only enable when needed and make sure to have enabled archive-logging as logfiles will rollover a lot faster with SQL tracing enabled.
As these are “global” logging settings, you need to restart the SMS_Executive service for this to take effect. Once that’s done you should see files appearing in the folder you just created.
Note : I would recommend to enable archive logging by default (not SQL Tracing !) The overhead is minimal and the benefit is that you get a lot more history in case of an issue.
At this stage we haven’t really added any debug/verbose logging yet on the server-side (except maybe inject the SQL statements in the logs). To accomplish that we need to take a look at the subkeys under HKLM\Software\Microsoft\SMS\Tracing.
You’ll notice that each individual component has a subkey here, Eg :
- SMS_Collection_Evaluator
- SMS_Distribution_Manager
- SMS_Package_TransferManger
- …
With a few exceptions, most components have these values :
- DebugLogging (0)
- Enabled (1)
- LoggingLevel (1)
- LogMaxHistory (10)
- MaxFileSize (2621440)
- TraceFilename (C:\Program files.…)
To get more details in our logfiles, simply flip Debuglogging from 0 to 1 and LoggingLevel van 1 to 0 for the component you are interested in. You could increase the log-file size as well (filesize is in bytes, so by default it’s around 2.5MB) but I rather recommend to enable archive logging and merging the logfiles in CMtrace.
For these settings to take effect you could restart the SMS_Executive service but that would be overkill in this scenario. Just restarting the component that you manipulated would be sufficient.
This can be achieved in a few ways. One would be to launch the “Configuration Manager Service Manager” from either the console (Monitoring - System Status - Component Status - Start - Configuration Manager Service Manager ) or directly launch it from \Program files\Microsoft Configuration Manager\Bin\X64\CompMgr.exe
Select the component you modified in the registry, Query it, Stop it, Query again and once stopped, Start it again. Done ! Now this component will be in verbose/debug mode.
What is happening in the background when you are pushing the buttons in service manager, is that the registry is being manipulated and queried back for results. The good thing about this, is that we can easily do this as well without the tool (since we were playing around in the registry anyway …)
Start/Stop individual components
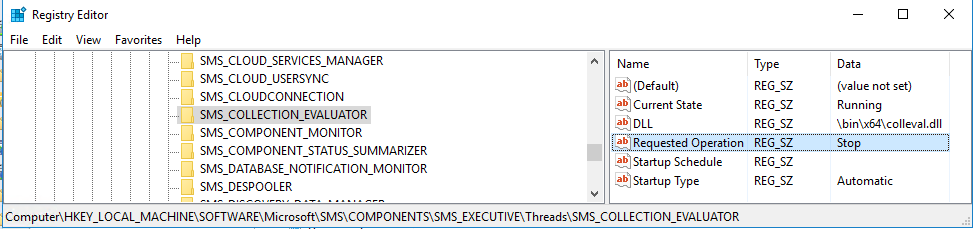
In the Registry, navigate to HKLM\Software\Microsoft\SMS\Components\SMS_Executive\Threads
This list should be identical to what you see when listing the components in the Service manager tool. Take the component you just enabled debug/verbose logging on and it should contain the following values :
- Current State (mostly “Running”)
- DLL (\Bin\X54<component>.dll)
- Requested Operation (None)
- Startup Schedule (Empty)
- Startup Type (Automatic)
To restart this specific component, update the “Requested Operation” to “Stop”
Refresh your view and you’ll notice that Current State has changed from Running to Stopped (or depening on the component it will be “Stopping” and you need to refresh a few more times, eg: distmgr) and that the Requested Operation is “None” again.
(this state will be reflected in the log for this component)
Guess what… to start it again, enter “Start” in the Requested Operation data field, refresh your view and all should be back to normal and your component is Running again.
Again, all of this is what is happening in the background when you are pushing the Query (refreshing your view in the registry), Stop (entering stop in Requested Operation) & Start (entering start in requested operation) buttons in the Configuration Manager Service Manager tool.
Note : If you would leave a component in the Stopped state, eg in a troubleshooting scenario where you want to see the files in the inboxes before they are being processed immediatly by that particular component, you will notice that after a while (5 minutes by default) the component is re-initialized automatically and will be running again even though you never started it manually.
A quick way around this would be to stop the Site Component monitor as this is the component that will monitor and start components again. (stopping the site component monitor is done using the same method as described above)
That’s all there is to it. Just make sure to undo those changes once troubleshooting is over! Enjoy and be carefull when playing around with these settings ;-)


Leave a Comment