
Logging in a cloud-world - Part 2
Copying log files through azure was great start, now let’s try and make it more secure !
Intro
Allright! In Part 1 we’ve seen how to get the same capability of centralized logging that we have been enjoying on-premises, but now over the internet.
While this solution works fine, there could be a security concern. After all, anyone with access to the SAS key (that is distributed each time a device is being staged), can download and examine our logfiles.
The answer to this concern : Encryption!
Let us encrypt the logfiles before we upload them to azure, and then after downloading them, decrypt it again with a key only known to the downloader.
Before we get all pratical on how to set it up, a few words on the encryption process itself.
Symmetric vs. Asymmetric Encryption
Symmetric key encryption uses the same (secret) key to both encrypt and decrypt the data. This poses a challenge in our process. Since we have to encrypt the data before uploading it, it means that our key is present on our staged device. If someone can get a hold of this key, we could decrypt all other encrypted logfiles as well.
Asymmetric key encryption, also known as public key encryption, uses 2 different key’s to encrypt/decrypt the data. A public key available to everyone that wants to use it, and a private key only available to you.
A message that is encrypted using a public key can only be decrypted using a private key, while also, a message encrypted using a private key can be decrypted using a public key. Security of the public key is not required because decryption is done using our private key.
So, that’s settled then ? We will use asymmetric key encryption ? We take the public key to encrypt the logfiles before uploading them, and then use the private key to decrypt the data. Done!
If only life was that simple ;)
As it turns out, most asymmetric key algorithms can’t be used on “large” files. And large is a bit of an understatement. It seems that it can roughly encrypt the same amount of bits as the amount of bits we used to generate the key. So a 2048bit key can only encrypt 2048bits of data.
That’s not nearly enough for our purpose.
The solution here is to combine both methods!
1) on the staging machine, we generate a symmetric key and encrypt our data with it
2) we then encrypt this symmetric key with our public key (that is freely available)
3) both the (symmetric) encrypted data and (asymmetric) encrypted key are uploaded to azure
4) both files are downloaded again on the device used to read the logs
5) The symmetric key is decrypted using our private key (only known to us)
6) the data is decrypted using our (freshly decrypted) symmetric key
While that may sound very complicated, you’ll see that in practise it’s not so bad. So let’s take a look at how to put this in place.
Preparations
I assume you’ve configured your environment like we discussed in part 1 as we will use this as a foundation for part 2. I would strongly recommend getting it up & running without encryption anyway, so that you know the entire procedure is working as expected.
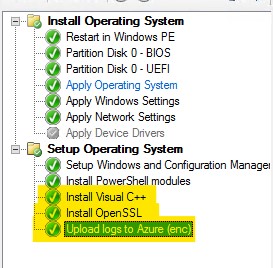
In order to proceed with encryption, we need to add 2 steps to our task sequence.
We are going to use a windows distribution of OpenSSL to perform the actual cryptography. For this to work, you need the X64 bits of the visual C++ redistributables. Download here
We’ve created an application to install this during our task sequence. It could very well be that you have this already configured in your task sequence as those distributables are often needed for other applications as well.
Note : the silent install parameters are : “/install /quiet /norestart”
Note 2: Patch my PC offers a way to automatically generate applications for the software they can patch, this includes those visual C++ redistributables.
The second step to our task sequence is the actual installation of OpenSSL. For this demo, I’ve used the binaries provided by FireDeamon, but there are probably others available that are equally good. Download the binaries here (website with the details to OpenSSL)
On a workstation that has the previously mentioned x64 vcredist installed, extract the OpenSSL zipfile to, eg, c:\openssl
open a command prompt and navigate to ‘C:\openssl\x64\bin’
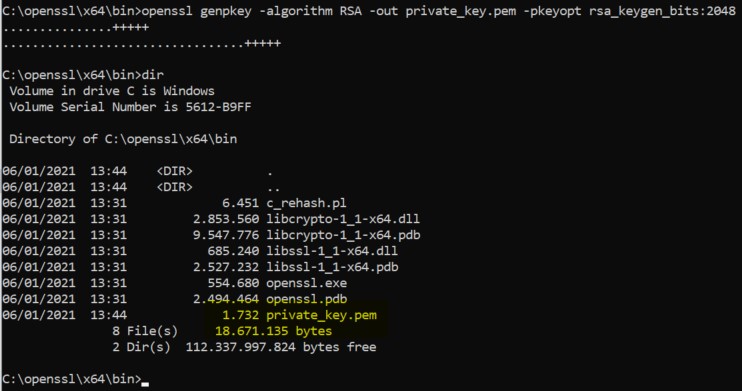
The following command will create our 2048 bits private key called “private_key.pem” :
openssl genpkey -algorithm RSA -out private_key.pem -pkeyopt rsa_keygen_bits:2048
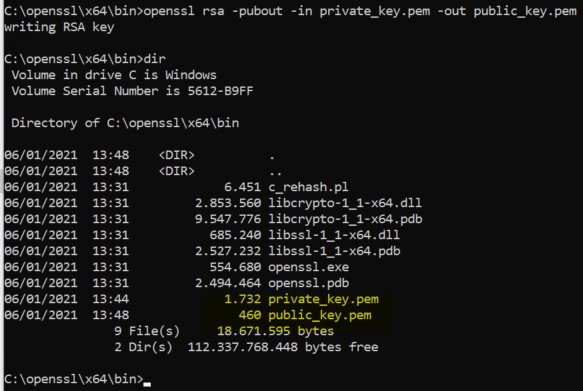
Next, we need to generate the public key (public_key.pem) out of this private key :
openssl rsa -pubout -in private_key.pem -out public_key.pem
Alright, with both keys ready, we can move forward to the implemenation of OpenSSL in our task sequence.
Before you move forward, this next step is extremely important!
Take your private key (private_key.pem) out of this folder and store it somewhere safe !! We will need it later on to decrypt our content, but we have to make sure it doesn’t end up on our staging devices.
Task sequence modifications
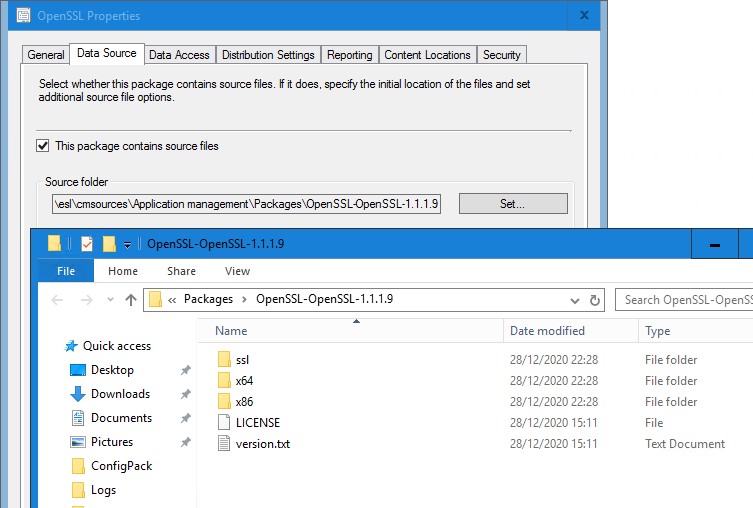
With the private key safely stored somewhere else, create an SCCM package with the content of the remaning OpenSSL folder we just created (thus with the public key still in this bin subfolder)
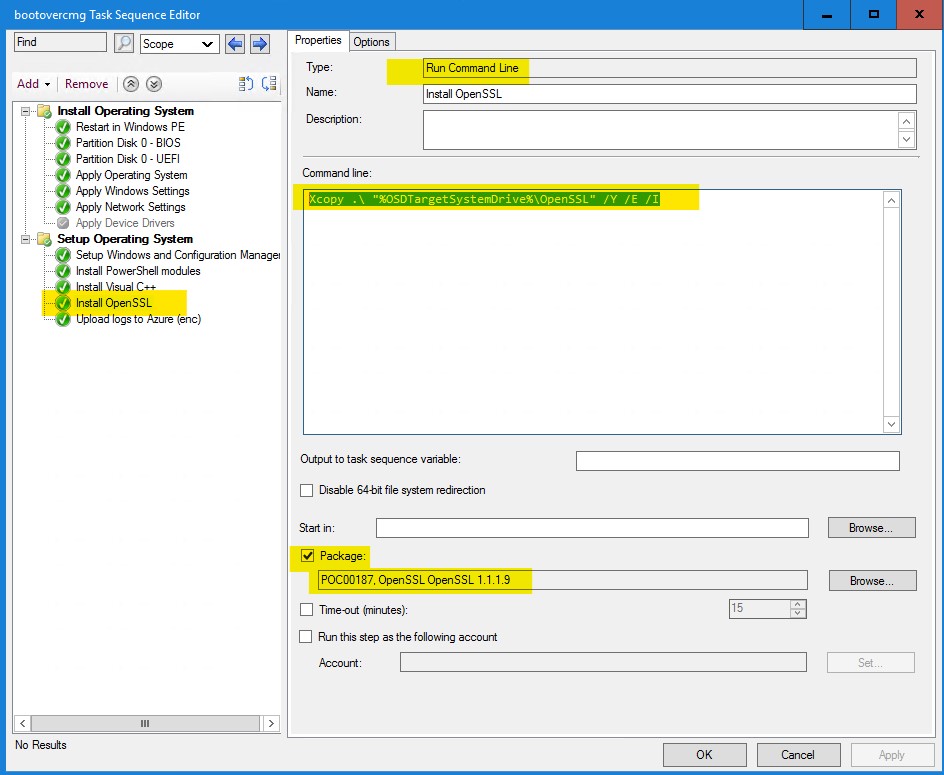
In your task sequence, after you installed this Visual C++ redistributable, add a run command line step with the following command.
Xcopy .\ "%OSDTargetSystemDrive%\OpenSSL" /Y /E /I
Make sure, in this “run command line” step, to select your OpenSSL package we previously created. This command will then copy the entire content of this package to C:\OpenSSL
As a last step, we will adjust the “upload” script we previously used to include the encryption.
1
2
3
4
5
6
7
8
9
10
11
12
13
14
15
16
17
18
19
20
21
22
23
24
25
26
27
28
29
30
31
32
33
34
35
36
37
38
39
40
41
42
43
44
45
46
47
48
49
50
51
52
53
Import-Module azure.storage

$BlobProperties = @{

    StorageAccountName   = 'osdlogging'
    storSas              = '?sv=2019-12-12<<<rest of key is censored>>>'
    container            = 'osdlogs'
}

$tsenv = New-Object -COMObject Microsoft.SMS.TSEnvironment
$TSHostname = $tsenv.Value("OSDComputername")
$TSLogpath = $tsenv.Value("_SMSTSLogPath")

if ($TSHostname -eq "")
{
    write-host "OSDComputername is empty, using SMSTSMachinename as hostname"
    $TSHostname = $tsenv.Value("_SMSTSMachineName")
}
write-host "Hostname will be : $TSHostname"

$hostname = ($TSHostname).tolower()
$Timestamp = get-date -f yyyy-MM-dd-HH-mm-ss
$localpath = "C:\LogsToAzure\$hostname-$Timestamp"

New-Item -ItemType Directory -Path $localpath -Force
New-Item -ItemType Directory -Path $localpath\Panther -Force
New-Item -ItemType Directory -Path $localpath\Software -Force
New-Item -ItemType Directory -Path $localpath\CCM -Force
New-Item -ItemType Directory -Path $localpath\Dism -Force

Get-ChildItem -Path C:\Windows\Panther | Copy-Item -Destination $localpath\Panther -Recurse
Get-ChildItem -Path C:\Windows\Logs\Software | Copy-Item -Destination $localpath\Software -Recurse
Get-ChildItem -Path C:\Windows\CCM\Logs | Copy-Item -Destination $localpath\CCM -Recurse
Get-ChildItem -Path C:\Windows\Logs\Dism | Copy-Item -Destination $localpath\Dism -Recurse
Get-Childitem -Path $TSLogpath | Copy-Item -Destination $localpath -Recurse

write-host "compressing logfiles"
Compress-Archive -Path $localpath -DestinationPath "C:\LogsToAzure\$hostname-$Timestamp.zip"

write-host "Generating symmetric key"
C:\Openssl\x64\bin\openssl rand 100 > "C:\LogsToAzure\symmetric_keyfile.key"

write-host "Encrypt zipfile with symmetric key"
C:\Openssl\x64\bin\openssl enc -in "C:\LogsToAzure\$hostname-$Timestamp.zip" -out "c:\logstoazure\$hostname-$Timestamp.enc" -e -aes-256-cbc -md sha512 -pbkdf2 -iter 100000 -salt -pass file:"C:\LogsToAzure\symmetric_keyfile.key"

write-host "Encrypt symmectric key with public key"
C:\Openssl\x64\bin\openssl rsautl -encrypt -inkey "C:\Openssl\x64\bin\public_key.pem" -pubin -in "C:\LogsToAzure\symmetric_keyfile.key" -out "C:\LogsToAzure\$hostname-$Timestamp.key.enc"

write-host "upload to azure"
$clientContext = New-AzureStorageContext -SasToken ($BlobProperties.storsas) -StorageAccountName ($blobproperties.StorageAccountName)

Set-AzureStorageBlobContent -Context $ClientContext -container ($BlobProperties.container) -File "c:\logstoazure\$hostname-$Timestamp.enc"
Set-AzureStorageBlobContent -Context $ClientContext -container ($BlobProperties.container) -File "C:\LogsToAzure\$hostname-$Timestamp.key.enc"
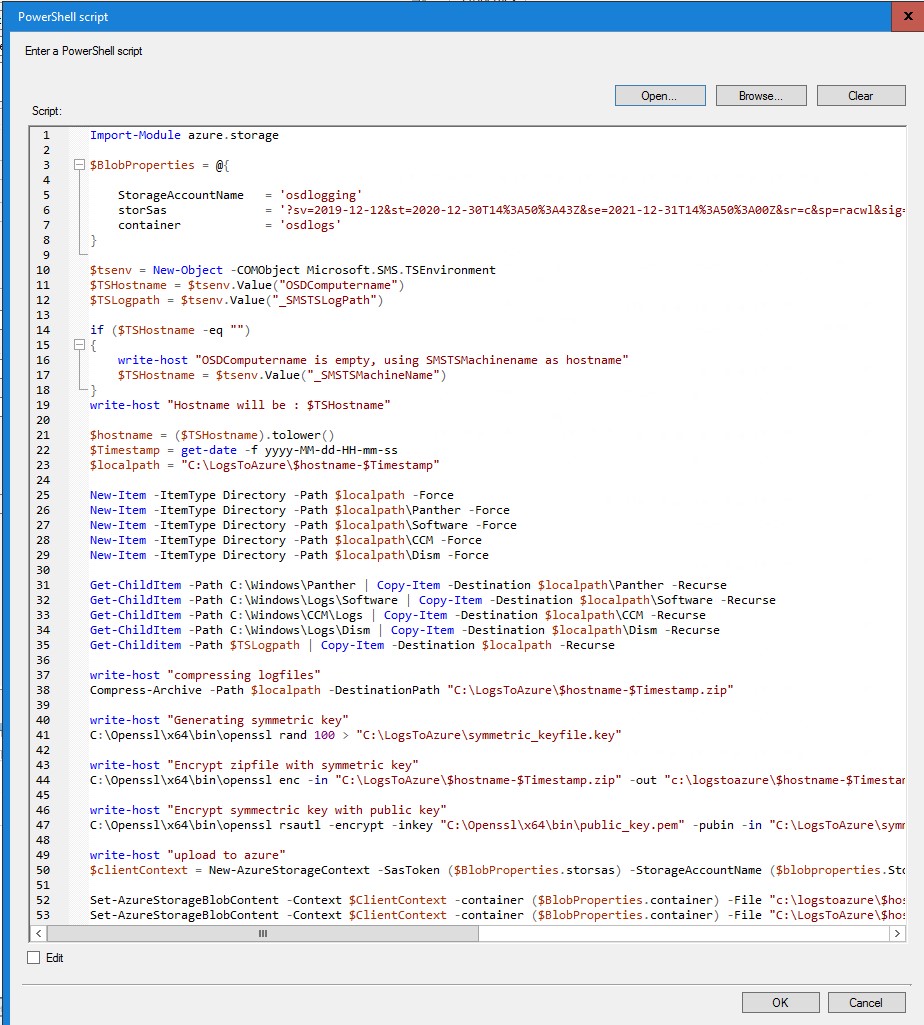
As you notice, the script is very similar to the initial script, at least the first part. We just added a few lines to take care of the encryption process :
- line 41 : a new symmetric key is created for this device
- line 44 : the compressed logfiles are encrypted with this symmetric key
- line 47 : the public key is used to encrypt the symmetric key
- lines 52 & 53 : both the encrypted zipfile and encrypted symmetric key are uploaded to azure
Like in part 1, don’t forget to adjust the variables for your azure storage on lines 5,6,7.
note : I prefer to upload the (small) encrypted symmetric key as the last file. This way, when I check for files to download, I am sure that the Zipfile is already present on our blob storage.
Ok, as a recap, these are the added/modified steps in our task sequence :
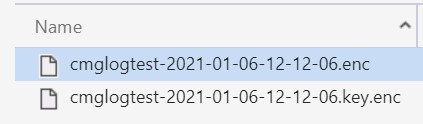
Run your task sequence, and if all goes well, you should see 2 files appearing in your storage explorer once the process is finished :
Retrieving and decrypting the logs
In order for the modified download script to work, I expect that you have a working version of OpenSSL in C:\OpenSSL with the private key (private_key.pem) in the X64\Bin folder.
1
2
3
4
5
6
7
8
9
10
11
12
13
14
15
16
17
18
19
20
21
22
23
24
25
26
27
28
29
30
31
32
33
34
35
36
37
38
39
40
41
42
43
44
45
46
Import-Module azure.storage

$BlobProperties = @{

    StorageAccountName   = 'osdlogging'
    storSas              = '?sv=2019-12-12<<<rest of key is censored>>>'
    container            = 'osdlogs'
}
$clientContext = New-AzureStorageContext -SasToken ($BlobProperties.storsas) -StorageAccountName ($blobproperties.StorageAccountName)

$files = Get-AzureStorageBlob -container ($BlobProperties.container) -Context $clientContext

foreach ($file in $files)
{
    write-host $file.name
    $last7chars = $file.name.SubString($($file.name).Length-7)
    write-host $last7chars
    if ($last7chars -eq "key.enc")
    {
        Write-host "Downloading the encryption key"
        Get-AzureStorageBlobContent -Destination "C:\LogsFromAzure" -container ($BlobProperties.container) -Context $clientContext -Blob $file.name
        $logfile = $file.name.SubString(0,$($file.name).Length-7) + "enc"
        Write-host "Downloading the matching encrypted logfiles"
        Get-AzureStorageBlobContent -Destination "C:\LogsFromAzure" -container ($BlobProperties.container) -Context $clientContext -Blob $logfile

        write-host "Decrypting key with private key"
        C:\Openssl\x64\bin\openssl rsautl -decrypt -inkey "C:\Openssl\x64\bin\private_key.pem" -in "C:\LogsFromAzure\$($file.name)" -out "C:\LogsFromAzure\symmetric_keyfile_dec.key"

        write-host "decrypting logfiles"
        C:\Openssl\x64\bin\openssl enc -in "C:\LogsFromAzure\$logfile" -out "C:\LogsFromAzure\decrypted.zip" -d -aes-256-cbc -md sha512 -pbkdf2 -iter 100000 -salt -pass file:"C:\LogsFromAzure\symmetric_keyfile_dec.key"

        write-host "expanding logfiles"
        Expand-Archive -Path "C:\LogsFromAzure\decrypted.zip" -DestinationPath "C:\LogsFromAzure"

        write-host "cleaning up"
        Remove-Item -Path "C:\LogsFromAzure\decrypted.zip" -Force
        Remove-item -Path "C:\LogsFromAzure\symmetric_keyfile_dec.key" -force
        Remove-Item -Path "C:\LogsFromAzure\$logfile" -force
        Remove-Item -Path "C:\LogsFromAzure\$($file.name)" -Force

        Remove-AzureStorageBlob -container ($BlobProperties.container) -Context $clientContext -Blob $logfile
        Remove-AzureStorageBlob -container ($BlobProperties.container) -Context $clientContext -Blob $file.name

    }

}
Again, don’t forget to adjust the variables for the azure storage on lines 5,6,7 !!
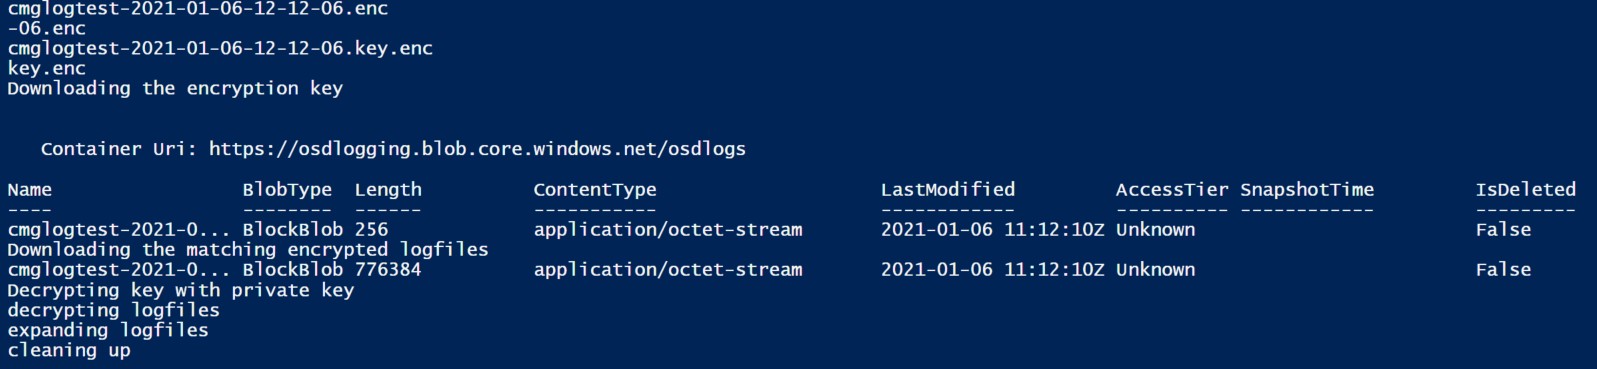
This script is a bit more complicated than the previous download script :
First, we check all files on azure blob storage. if a symmetric key is found (file ending on “key.enc”), we perform the following steps
- line 21 : the download of the symmetric key
- line 24 : the download of the encrypted zipfile that was encrypted with the key from line 21
- line 27 : the symmetric key is decrypted using our private key we created in our preparation steps
- line 30 : the encrypted zipfile is decrypted using the decrypted symmetric key from line 27
- line 33 : the decrypted zipfile is expanded
- rest of the script is used to cleanup the azure and the files we no longer need after decryption.
Conclusion
That’s it, we’re done :)
It might initially look a bit overwhelming to get encryption up and running, but you’ll notice, when you start implementing this, that it’s really not that complicated as it initially seems.
These scripts allow you automate the process end-to-end once you’ve created your private & public key.
The symmetric key used for encrypting the logfiles is randomly generated for each device and this key is then transmitted safely using public key encryption.
While researching this, I was rather surprised how simple it all was once everything was up & running. It’s actually worth considering using this mechanism more often as it does not really add much steps to the process while making it a whole lot more secure.
Thanks for reading these 2 blogposts. I hope you enjoyed it as much as I did writing and researching.
Feel free to leave comments below if you have questions or issues!
Take care,
Tom


Leave a Comment