
Logging in a cloud-world - Part 3 (Intune/Autopilot)
Let’s implement the functionality we discussed in Part 1 and Part 2 in Autopilot/Intune.
Intro
So here we are, in the 3rd part of a 2 part blog series ;-)
After getting the second part up & running, I figured it might be nice to apply the same solution in an autopilot scenario. This comes with its own set of challenges ofcorse, so this post aims to tackle all those challenges.
This blogpost won’t cover setting up Autopilot. I assume you have a working autopilot enrollment profile before you proceed with this blog. Everything else should be covered here!
We will gather all the relevant logs at the end of an autopilot enrollment and upload them with encryption to our azure blob storage.
We cannot simply copy/paste the SCCM/Task sequence solution since autopilot isn’t a task sequence. There is no list of sequential steps that we can edit in order for the last step to gather the logs and upload them Azure. Time to get a bit creative then !
Note : we are going to re-use binaries and scripts found in Part 1 and Part 2 , but for your convenience, I will put all necessary links and scripts here as well. If you read the first 2 parts, there will be pieces in this blog that are copied from the other 2.
Azure Preparations
We are going to use Azure blob-storage as an intermediate storage solution. We will copy the logs to blob storage and retrieve them from there for investigation.
There are multiple ways of storing logs/files in azure, there might be even better ways than how I chose to do it.
This is just one possibility to get you started. By all means choose the solution that you are most comfortable with.
First of all, let’s prepare our blob-container to host the logfiles.
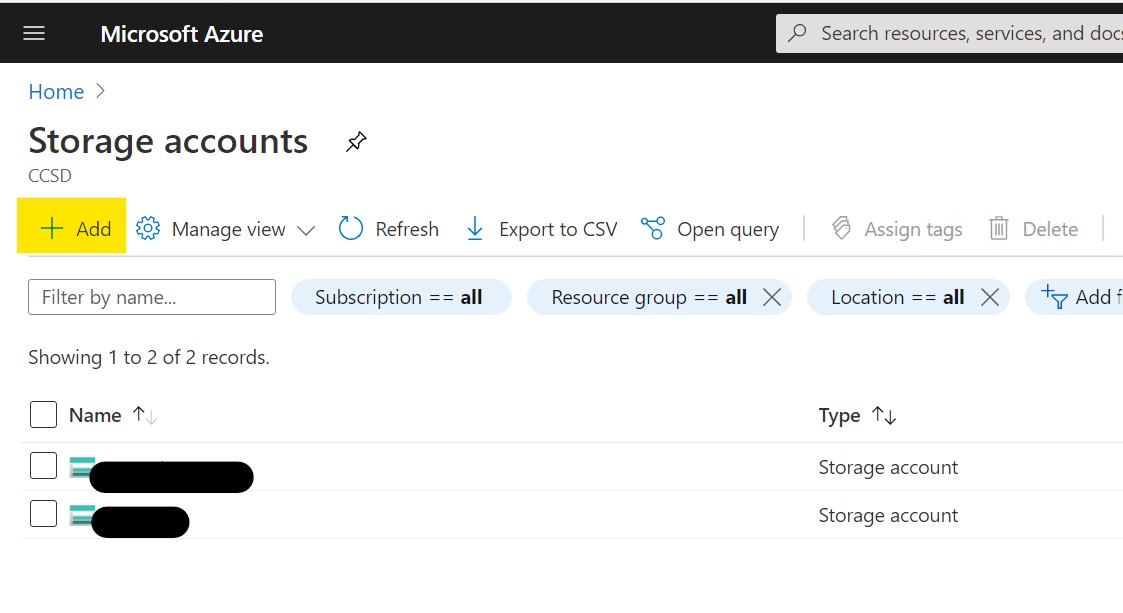
Log-on into the Azure portal with an account that has sufficient access and navigate to “Storage Accounts”. Depending on the account you used, you might already see some storage containers.
Click the “Add” button to create a new storage container.
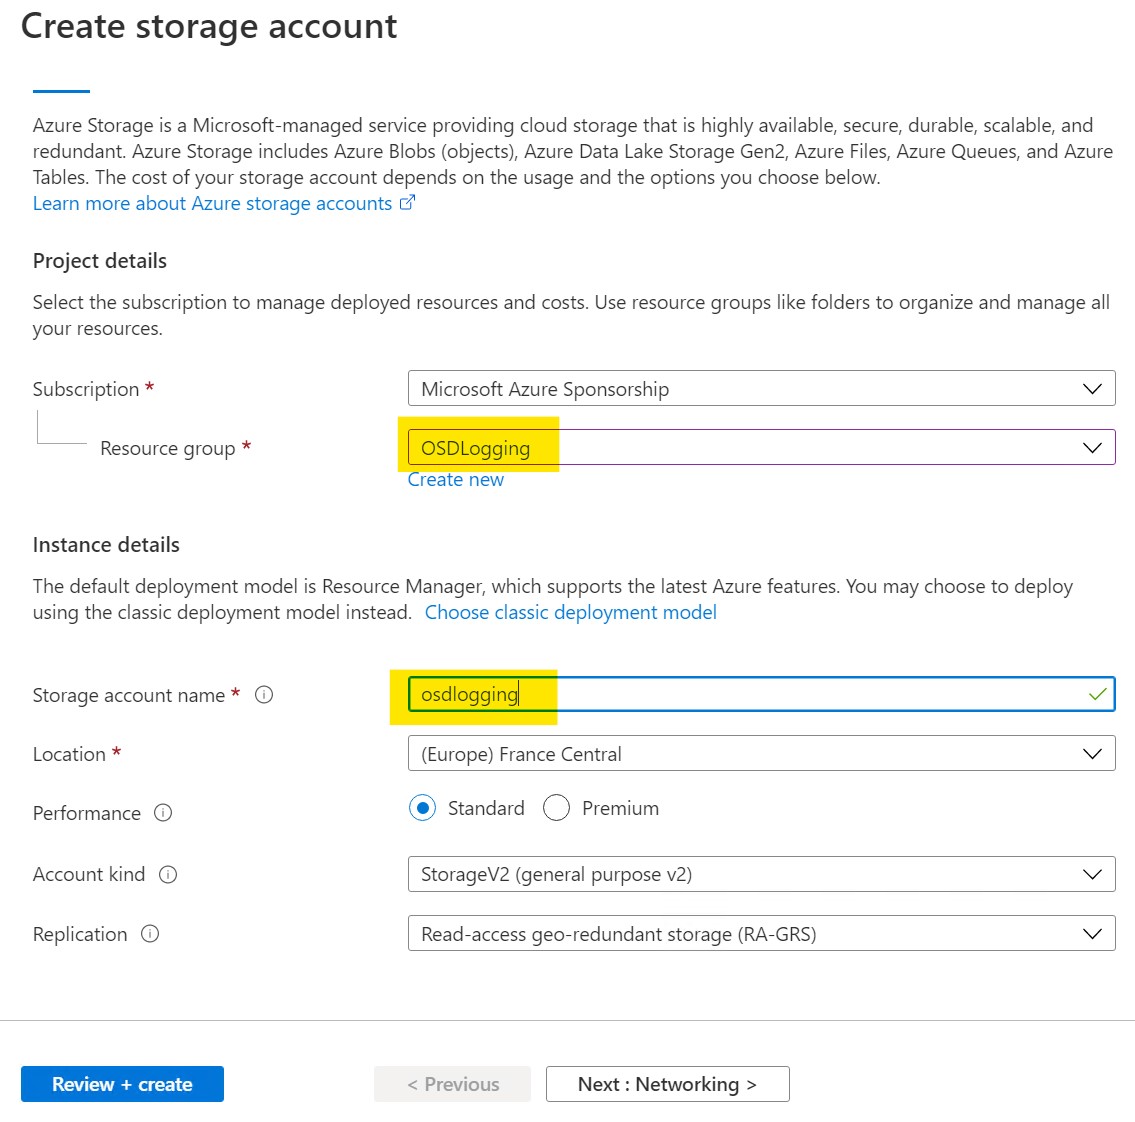
Select, or create a new resource group and choose a name for your container. If needed, you can adjust the options in the other sections, but for our purpose, the defaults are good enough, so just click “Review + Create”.
After reviewing click “Create” to actually create our blob container
If you don’t have it, download and install Microsoft Azure Storage Explorer as it offers an easy GUI to work with our storage containers.
When you first start the tool, a wizard will pop-up asking you to connect to azure storage. Select the first option “add an azure account” and click next.
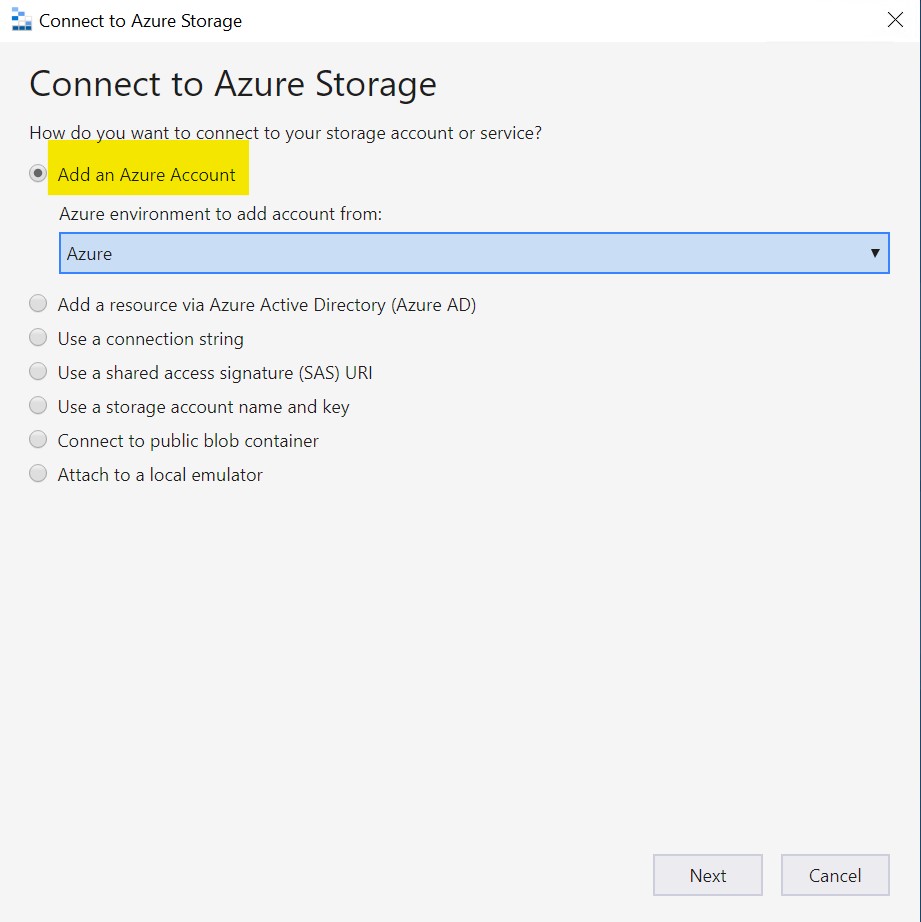
Log in with the account that you used to create the azure blob container.
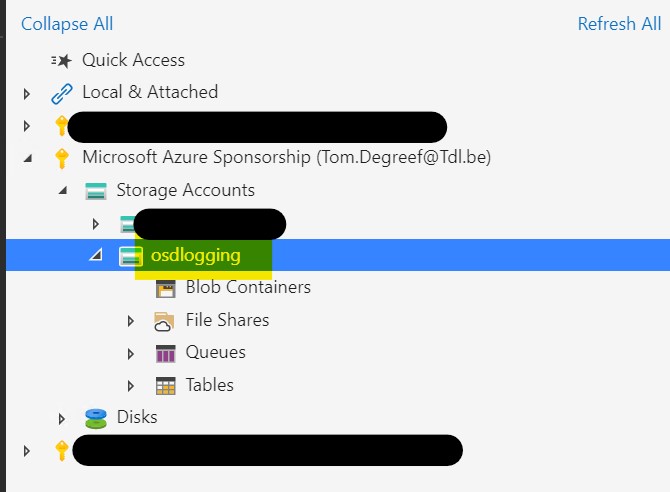
If all is well, you should be presented with a list of subscriptions that you are entitled to. Expand the subscription you just used to create your container and the container should become visible under “Storage accounts”
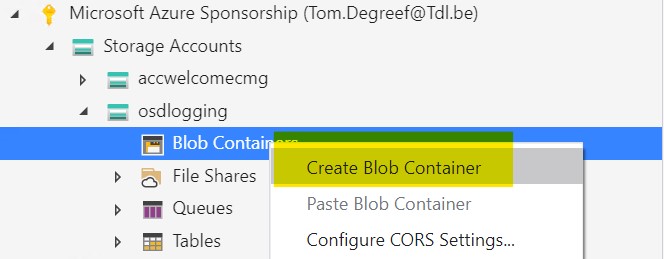
Right-click “Blob Containers” and select “Create Blob Container”
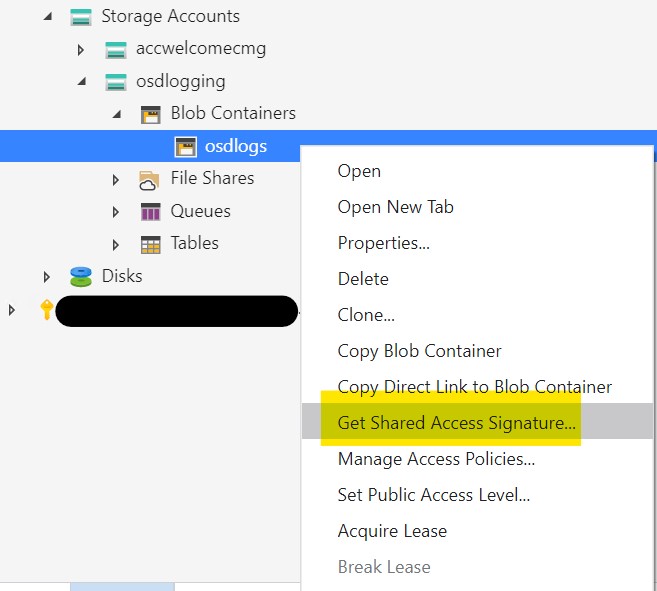
Give it a name to your liking and click OK. In my example, i chose “osdlogs”.
Right-click your newly created container and select “Get Shared access Signature” (I will refer to this as the SAS key in the remainder of this blog)
We are going to create 2 SAS-keys. 1 with “write” access to upload the logs, and 1 with additional delete rights to clean up the container after we retrieved the logs.
For our first key, configure it with these settings :
- Start time : your current date/time
- Expiry time : I set it to 1 year in the future
- Permissions : Read,Add, Create, Write, List (not shown in screenshot)
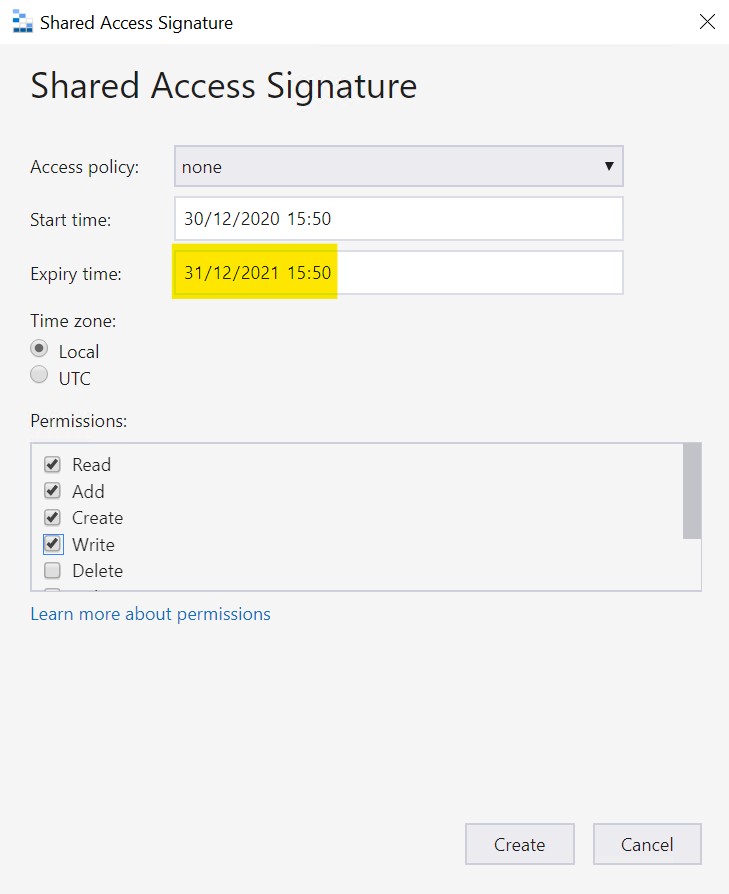
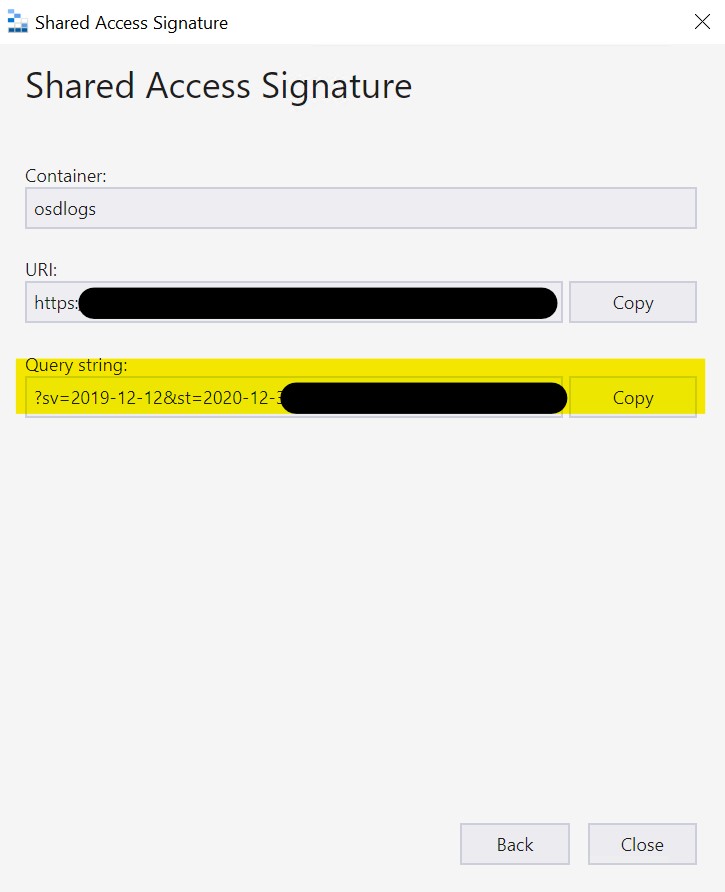
Click “Create” and Copy and save(!!) the Query string. We will need it later.
Repeat this process and create another SAS-key, but add the “Delete” permission in this one. Again, copy and save the Query string for later use.
Package Preparations
We will create an Intune win32 app that will install all the necessary components for the encryption to work and then, we will create a scheduled task that will run one time at first logon. This scheduled task will kick-off a script that gathers what we need and uploads the logs.
Since we have no control over the order that those apps will get installed in during autopilot enrollment, I had to come up with a solution that would upload the logs after everything was finished. Hence the scheduled task.
In my lab, I used the Powershell app depoyment toolkit to basically do everything we need to have configured. Once that is done, we need to convert it to a format Intune understands. This is done using the Win32 content prep tool.
For your convenience, I have prepared the PSADT package with the necessary scripts already included. You will need to make a few adjustments and add the nessecary binaries for the scripts to work.
Download my PSADT file [here]https://www.oscc.be/Files/PSADT.zip
Name: PSADT.zip
Size: 165832 bytes (161 KiB)
SHA256: 5E7C17313AC2C73D5DB7986B8253775930A707F49B8B9E27FFB370037231C3F2
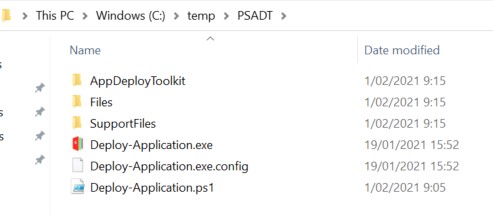
Extract the zipfile to C:\Temp
Next we need to download the binaries for everything to work :
- Azure.Storage (Powershell module)
- AzureRM.Profile (powershell module)
- OpenSSL-1.1
- VC_Redist.X-64.Exe
Check your local modules folder to see if you already have this “Azure.Storage” and “AzureRM.Profile” modules installed (C:\Program Files\WindowsPowerShell\Modules)
If not, open an admin powershell window and run the following command to install them :
install-module azure.storage
install-module azureRM.profile
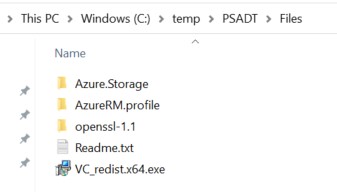
Copy those 2 folders to C:\temp\PSADT\Files
(There is also a readme.Txt file in the C:\temp\PSADT\Files folder that holds the details of the files needed)
OpenSSL can be downloaded here (website with the details to OpenSSL) and the X64 VcRedist can be found here
Like with the Powershell modules, copy them to the C:\temp\PSADT\Files subfolder. Once you gathered all the files, it should look like this :
Encryption Keys
The whole “why & how” is explained in Part 2. So I am just going to focus on functionality in this blog.
We need to generate a Private and a public key for encryption purposes.
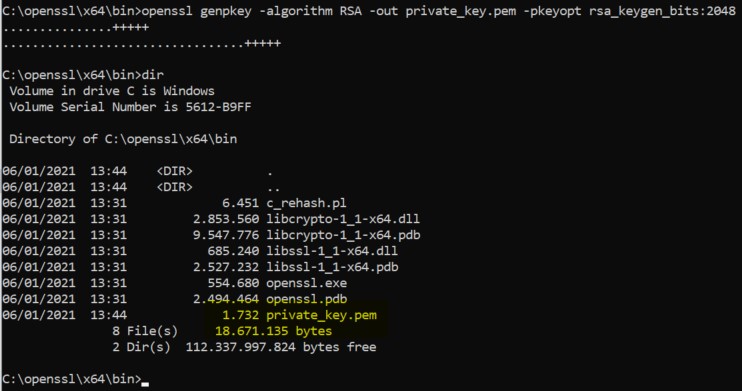
Open a command prompt and navigate to ‘C:\temp\PSADT\Files\openssl-1.1\x64\bin’ (If the following command should fail, make sure you have the previously mentioned vc++ redist installed)
The following command will create our 2048 bits private key called “private_key.pem” :
openssl genpkey -algorithm RSA -out private_key.pem -pkeyopt rsa_keygen_bits:2048
Next, we need to generate the public key (public_key.pem) out of this private key :
openssl rsa -pubout -in private_key.pem -out public_key.pem
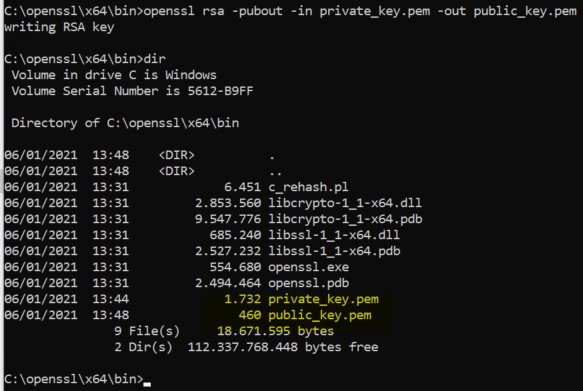
Alright, with both keys ready, we can move forward to the next steps.
Before you move forward, this next step is extremely important!
Take your private key (private_key.pem) out of this folder and store it somewhere safe !! We will need it later on to decrypt our content, but we have to make sure it doesn’t end up on our workstations that are enrolled via Autopilot.
Updating script details
Browse to ‘C:\temp\PSADT\SupportFiles’ and edit the file ‘Uploadlogstoazure_autopilot.ps1’ with an editor of your choice.
Make the following small changes on these lines :
1) On line 5, set the StorageAccountName to the StorageAccountName we created in the azure portal
2) On line 6, replace the content of the storSAS variable with your “Write” SAS-key
3) On line 7, provide the name of the blob-container we created in our preparation step using the storage explorer tool.
The full explanation of this script can be found in Part 1 and Part 2. What is differend in this specific script is :
- Line 20 : creation of a folder for the Intune management extension logs
- Line 25 : Copy of the IME logs
- Line 45 : Removal of the scheduled task, so it runs just once !
Note : This is just an example set of logfiles you can gather, there could be others of interest in your environment, just add them to the script above.
The details on the PSADT Script that prepares everything is explained at the end of this blog under the “Deployment Script details explained” header for those that want to know more on that part.
Validation
At this point, It probably makes sense to test the entire flow before we upload it to Intune.
Copy your full PSADT package to a test computer and from an admin command prompt, run the “Deploy-Application.exe”.
It shouldn’t take long to run and the endresult should be :
-
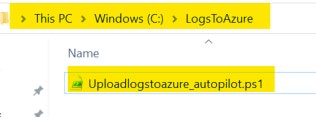
A folder called “C:\LogsToAzure” with a script in it called Uploadlogstoazure_autopilot.ps1
-
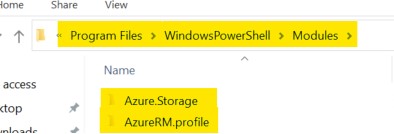
The azure Powershell modules in C:\Program Files\WindowsPowerShell\Modules
-
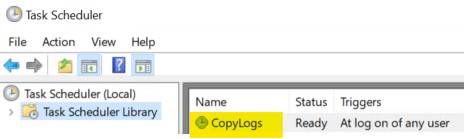
A scheduled task called “CopyLogs” in the root of your scheduled tasks library (launch task scheduler as admin if you don’t see the task!)
If all those items are indeed where they are supposed to be, we can validate the next step and reboot this test-pc. Once you logon (doesn’t need to be as an admin), your script should kick in action and do it’s magic ;)
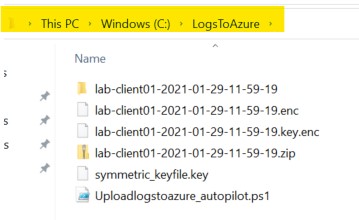
To validate this second piece, browse to the “C:\LogsToAzure” folder and you should see a bunch of files created
Also, fire up your Azure storage explorer (see Part 1) and validate that indeed your logfiles are uploaded to the blob storage !
It makes sense to see if you can download & decrypt the files as well :)
On the computer that you will use to download the logfiles, I expect that you have a working version of OpenSSL in C:\OpenSSL with the private key (private_key.pem) in the X64\Bin folder. (see beginning of this blog where we created those keys)
1
2
3
4
5
6
7
8
9
10
11
12
13
14
15
16
17
18
19
20
21
22
23
24
25
26
27
28
29
30
31
32
33
34
35
36
37
38
39
40
41
42
43
44
45
46
Import-Module azure.storage

$BlobProperties = @{

    StorageAccountName   = 'osdlogging'
    storSas              = '?sv=2019-12-12<<<rest of key is censored>>>'
    container            = 'osdlogs'
}
$clientContext = New-AzureStorageContext -SasToken ($BlobProperties.storsas) -StorageAccountName ($blobproperties.StorageAccountName)

$files = Get-AzureStorageBlob -container ($BlobProperties.container) -Context $clientContext

foreach ($file in $files)
{
    write-host $file.name
    $last7chars = $file.name.SubString($($file.name).Length-7)
    write-host $last7chars
    if ($last7chars -eq "key.enc")
    {
        Write-host "Downloading the encryption key"
        Get-AzureStorageBlobContent -Destination "C:\LogsFromAzure" -container ($BlobProperties.container) -Context $clientContext -Blob $file.name
        $logfile = $file.name.SubString(0,$($file.name).Length-7) + "enc"
        Write-host "Downloading the matching encrypted logfiles"
        Get-AzureStorageBlobContent -Destination "C:\LogsFromAzure" -container ($BlobProperties.container) -Context $clientContext -Blob $logfile

        write-host "Decrypting key with private key"
        C:\Openssl\x64\bin\openssl rsautl -decrypt -inkey "C:\Openssl\x64\bin\private_key.pem" -in "C:\LogsFromAzure\$($file.name)" -out "C:\LogsFromAzure\symmetric_keyfile_dec.key"

        write-host "decrypting logfiles"
        C:\Openssl\x64\bin\openssl enc -in "C:\LogsFromAzure\$logfile" -out "C:\LogsFromAzure\decrypted.zip" -d -aes-256-cbc -md sha512 -pbkdf2 -iter 100000 -salt -pass file:"C:\LogsFromAzure\symmetric_keyfile_dec.key"

        write-host "expanding logfiles"
        Expand-Archive -Path "C:\LogsFromAzure\decrypted.zip" -DestinationPath "C:\LogsFromAzure"

        write-host "cleaning up"
        Remove-Item -Path "C:\LogsFromAzure\decrypted.zip" -Force
        Remove-item -Path "C:\LogsFromAzure\symmetric_keyfile_dec.key" -force
        Remove-Item -Path "C:\LogsFromAzure\$logfile" -force
        Remove-Item -Path "C:\LogsFromAzure\$($file.name)" -Force

        Remove-AzureStorageBlob -container ($BlobProperties.container) -Context $clientContext -Blob $logfile
        Remove-AzureStorageBlob -container ($BlobProperties.container) -Context $clientContext -Blob $file.name

    }

}
Again, don’t forget to adjust the variables for the azure storage on lines 5,6,7 !!
Running this script should retrieve the logs and decrypt them.
Fingers crossed that everything worked as it should! If not, make sure to revisit all steps and execute the scripts in small pieces to see what could have gone wrong.
If everything worked as expected, we can do the final integration into Intune & Autopilot!
Creation of the Intune Package
With all scripts validated we can move forward to the cloud-part.
First, we need to wrap our PSADT in the intune wrapper. Download the latest version of the wrapper here
Open a command prompt on the device that hosts your PSADT package and navigate to the folder where you extracted your freshly downloaded Intune wrapper.
Run the tool called : “IntuneWinAppUtil.exe”
Specify the following details for :
- Source folder : C:\temp\PSADT
- Setup file : Deploy-Application.exe
- Output folder : C:\Temp
- Catalog : N

The tool will now generate a package that we can upload to Intune. You should find a file called ‘C:\Temp\Deploy-Application.intunewin’ once everything is finished.
Open the MEM portal
Navigate to Apps , All Apps and Add a new application. Select “Windows App (Win32)” as the app type and click Select.

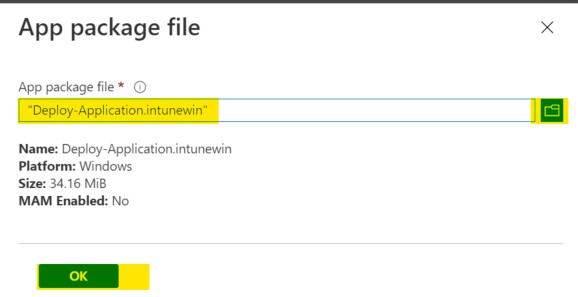
Select your ‘C:\Temp\Deploy-Application.intunewin’ file as the app package file
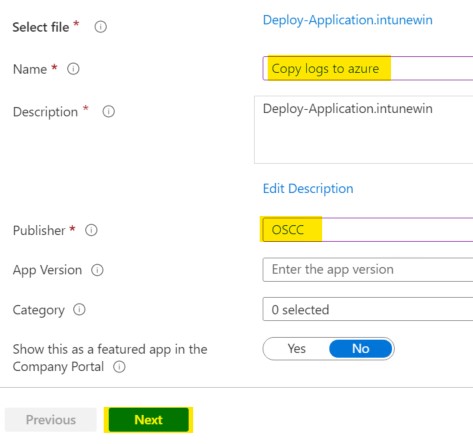
Update the Name and vendor to something more relevant and click Next
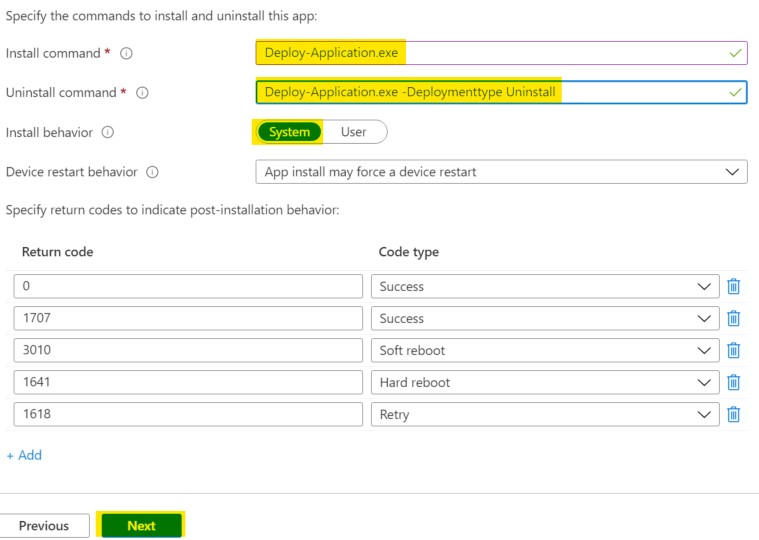
- Install command : Deploy-Application.exe
- Uninstall command : Deploy-Application.exe -Deploymenttype Uninstall
- Install behavior : System
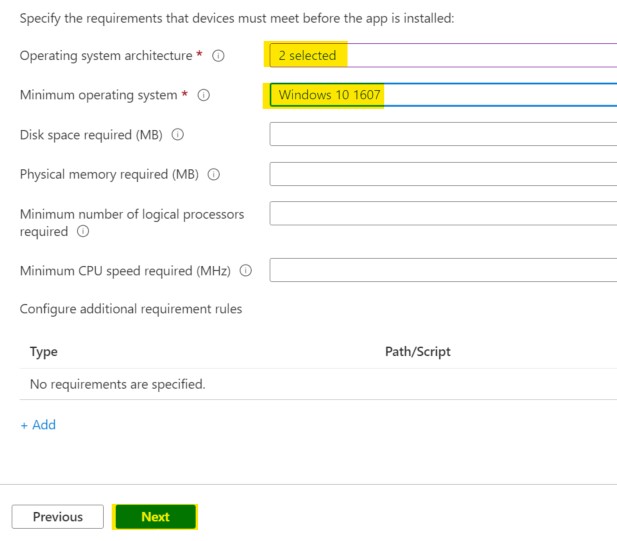
You can select both X86 and X64 as supported architecture and set the minimum operating system level to your liking
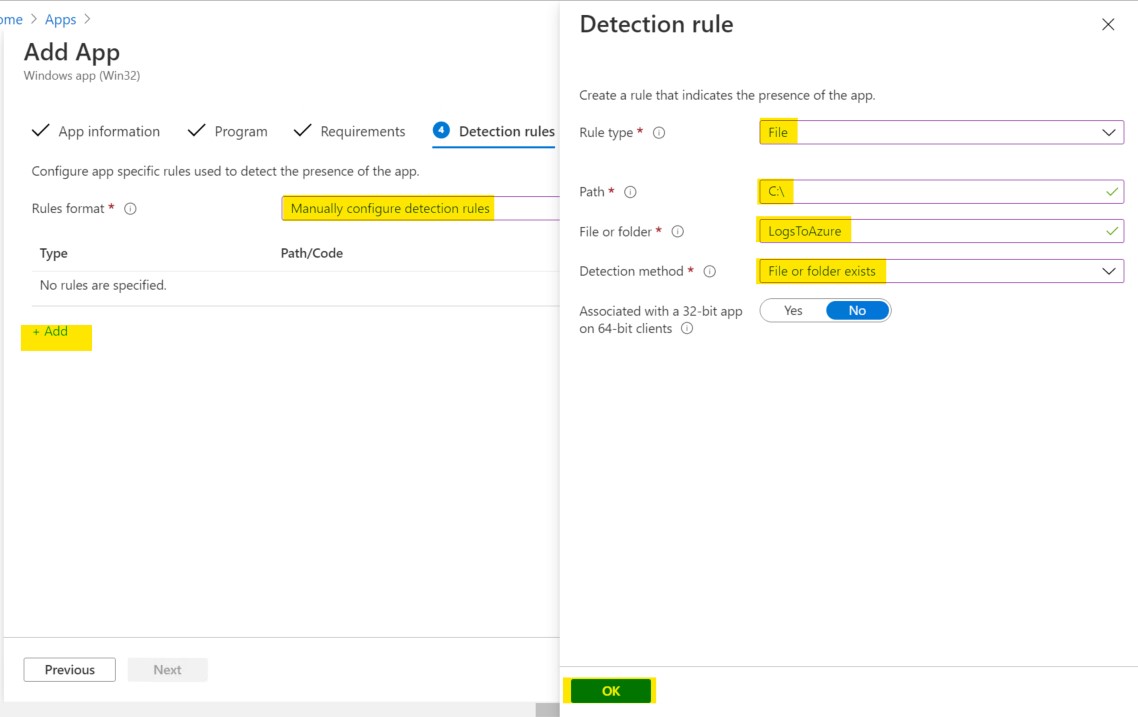
Manually configure the detection rule, Click Add and configure a file-type rule :
- Path : C:\
- File or folder : LogsToAzure
- Detection method : File or folder exists
We have no dependencies.
On the Assignments tab, deploy it as required to the group where you assigned your autopilot profile to.

Finish the wizard and create your application.
Once your app is uploaded, you are good to go. Deploy a device using autopilot (that is a member of the previously mentionned group) and if all is well, once you reach the logon screen, your log files should be available for you in Azure!
That’s it, we are done :)
BONUS : Deployment Script details explained
The deploy-application.PS1 file contains the following script. Here are the details on how it’s build up :
1
2
3
4
5
6
7
8
9
10
11
12
13
14
15
16
17
18
19
20
21
22
23
24
25
26
27
# Install azure storage powershell module
Copy-File -Path "$dirFiles\Azure.Storage\*" -Destination "C:\Program Files\WindowsPowerShell\Modules\Azure.Storage" -recurse

 # Install azure profile powershell module
Copy-File -Path "$dirFiles\AzureRM.profile\*" -Destination "C:\Program Files\WindowsPowerShell\Modules\AzureRM.profile" -recurse

# Install OpenSSL

Copy-File -Path "$dirFiles\openssl-1.1\*" -Destination "C:\openssl" -recurse

# Install VC++
Execute-Process -Path "$dirFiles\VC_redist.x64.exe" -Parameters '/install /quiet /norestart'

# Copy script locally
$ScriptLocation = "C:\LogsToAzure\Uploadlogstoazure_autopilot.ps1"

New-Folder -Path "C:\LogsToAzure"
Copy-File -Path "$dirsupportfiles\Uploadlogstoazure_autopilot.ps1" -Destination $ScriptLocation

$RunMyScript = "-executionpolicy bypass -Noninteractive -WindowStyle hidden -file $ScriptLocation"
#Create scheduled task
$trigger = New-ScheduledTaskTrigger -AtLogon
$action = New-ScheduledTaskAction -Execute "PowerShell.exe" -Argument $RunMyScript
$principal = New-ScheduledTaskPrincipal -UserId SYSTEM -LogonType ServiceAccount -RunLevel Highest
Register-ScheduledTask -TaskName "CopyLogs" -Description "CopyLogs" -Trigger $trigger -Action $action -Principal $principal

Get-ScheduledTask
Ok, so what have we done here ?
- Line 2 & 4 : Copy of the Azure Powershell modules to the correct subfolder
- Line 9 : Copy of the OpenSSL tool
- Line 12 : Installation of VC++
- Line 17 : Creation of the folder that we will use to gather the logs
- Line 18 : Copy of the script that will perform the log gathering
- remaining lines : creation of a scheduled task that will run at logon and trigger our script for the log gathering
What a journey! I hope you enjoy experimenting with this as much as I enjoyed writing this blog. As always, feel free to leave comments at the end of this blogpost.
Take care!
Tom


Leave a Comment